---
title: "Getting Started"
sidebar:
order: 1
icon: rocket
label: "Getting started"
description: "Install the varsafe CLI, log in, and get from zero to injected secrets in under five minutes."
---
import quickstart from '../examples/cli/quickstart.sh?raw';
import runInject from '../examples/cli/run-inject.sh?raw';
By the end of this page you will have the CLI installed, a secret stored in varsafe, and that secret injected into a running process — without a plaintext `.env` file on disk.
## Prerequisites
sign up free',
},
{
label: 'Supported',
value:
'Linux and macOS, x64 and arm64, on both glibc and musl — including Raspberry Pi, Graviton and ARM CI runners. Windows works via WSL.',
},
]}
/>
## From zero to injected secrets
1. **Install the CLI**
The CLI ships as a self-contained binary — it is not published on npm. The installer places it in `~/.varsafe/bin` and adds that directory to your shell's `PATH`:
```bash
curl -fsSL https://varsafe.dev/install.sh | bash
```
Open a new shell (or source your shell config), then verify:
```bash
varsafe --version
```
The CLI keeps itself current — run `varsafe update` any time to install the latest release.
:::warning[Command not found?]
The installer appends a `PATH` entry to your shell config (`~/.zshrc`, `~/.bashrc`, or fish config). If `varsafe` isn't found, restart your terminal or run `export PATH="$HOME/.varsafe/bin:$PATH"`.
:::
:::note[Alpine and other musl systems]
varsafe needs `libstdc++` and `libgcc` on musl-based systems. Running as root, the installer adds them for you. Otherwise it stops and tells you to run:
```bash
apk add --no-cache libstdc++ libgcc
```
Or re-run the installer with `VARSAFE_INSTALL_PREREQS=1` to let it use `sudo`. It won't do that on its own — a script piped from the internet shouldn't change your system packages just because `sudo` happens to be available.
It stops rather than continuing because without those libraries the binary cannot start at all. The installer also runs the downloaded binary once before putting it on your `PATH`, so a broken install fails loudly instead of silently.
:::
2. **Log in**
```bash
varsafe login
```
This opens your browser and shows a short confirmation code in the terminal. Approve the request in the browser — the code on screen must match the one in your terminal — and the CLI completes automatically. No password ever passes through the terminal.
If a browser isn't available (headless machine, container, CI runner), use an API token instead — see [CLI authentication](/cli#authentication).
3. **Point at a project and environment**
```bash
varsafe use -p my-api -e development
```
Saved locally, so the commands that follow do not need `-p` or `-e`.
4. **Store a secret**
Secret values are never accepted as arguments — they would leak into shell history and `ps` output. Pick whichever input suits you:
**Prompt**
```bash
varsafe set DATABASE_URL
```
Omit the value and the CLI asks for it with masked input. Best at a terminal.
**Pipe**
```bash
printf %s 'postgres://app:app@localhost:5432/app' | varsafe set DATABASE_URL --stdin
```
Best in scripts, where there is nothing to type into.
**From a file**
```bash
varsafe set TLS_PRIVATE_KEY --from-file ./server.key
```
Best for multi-line values such as certificates and private keys.
**From the environment**
```bash
varsafe set API_KEY --from-env BUILD_API_KEY
```
Best in CI, where the value already exists as a variable.
Then confirm it landed:
```bash
varsafe list # keys only — values stay masked
varsafe get DATABASE_URL # revealing a value is audited
```
:::tip[Key format]
Secret keys start with an uppercase letter and contain only uppercase letters, digits, and underscores (e.g., `DATABASE_URL`, `API_KEY`).
:::
5. **Inject it into your app**
This is the core workflow. `varsafe run` fetches your secrets over TLS and injects them as environment variables into the child process — never written to disk, gone when the process exits:
```bash
varsafe run -- npm run dev
```
Your app sees `DATABASE_URL` in its environment; your shell and filesystem never do. To prove it:
```bash
varsafe run -- sh -c 'echo "DATABASE_URL is ${DATABASE_URL:+set}"'
```
Expected output: `DATABASE_URL is set`.
## Recap
| Command | What it does |
| --- | --- |
| `varsafe use -p -e ` | Points the CLI at a project and environment, saved locally |
| `varsafe set KEY` | Stores a secret, prompting for the value with masked input |
| `varsafe list` | Shows the keys in scope, values masked |
| `varsafe run -- ` | Runs your app with secrets in its environment, nothing on disk |
| `varsafe export -o .env` | Writes an encrypted file, for tools that insist on one |
Everything else is a variation on these. `varsafe status` tells you which credential,
project, and environment the next command will use.
## Export when a file is required
Some tools insist on a `.env` file. `varsafe export` writes one — **encrypted by default**, so the file is useless without your environment's keys:
```bash
varsafe export -o .env
```
Plaintext requires an explicit opt-in with `--plain`. See [encrypted .env files](/guides/encrypted-env) and the [export workflow](/cli#export-secrets-to-a-file) for formats and options.
:::warning
Add plaintext `.env` files to your `.gitignore`. Encrypted exports are safe to commit, but plaintext ones are not.
:::
## The same flow, scripted
The script below uses the automation-style login: `$VARSAFE_TOKEN` holds an API token (in CI, from your CI secret store), `$VARSAFE_PROJECT` names the project, and `$VARSAFE_API_URL` points at the API — in normal usage you omit `--api-url` and the CLI talks to `https://api.varsafe.dev`.
And the injection flow end to end — note the child process assertion proving the secret arrived:
## Project setup
The dashboard gives you a full overview of your secrets across all projects and environments:
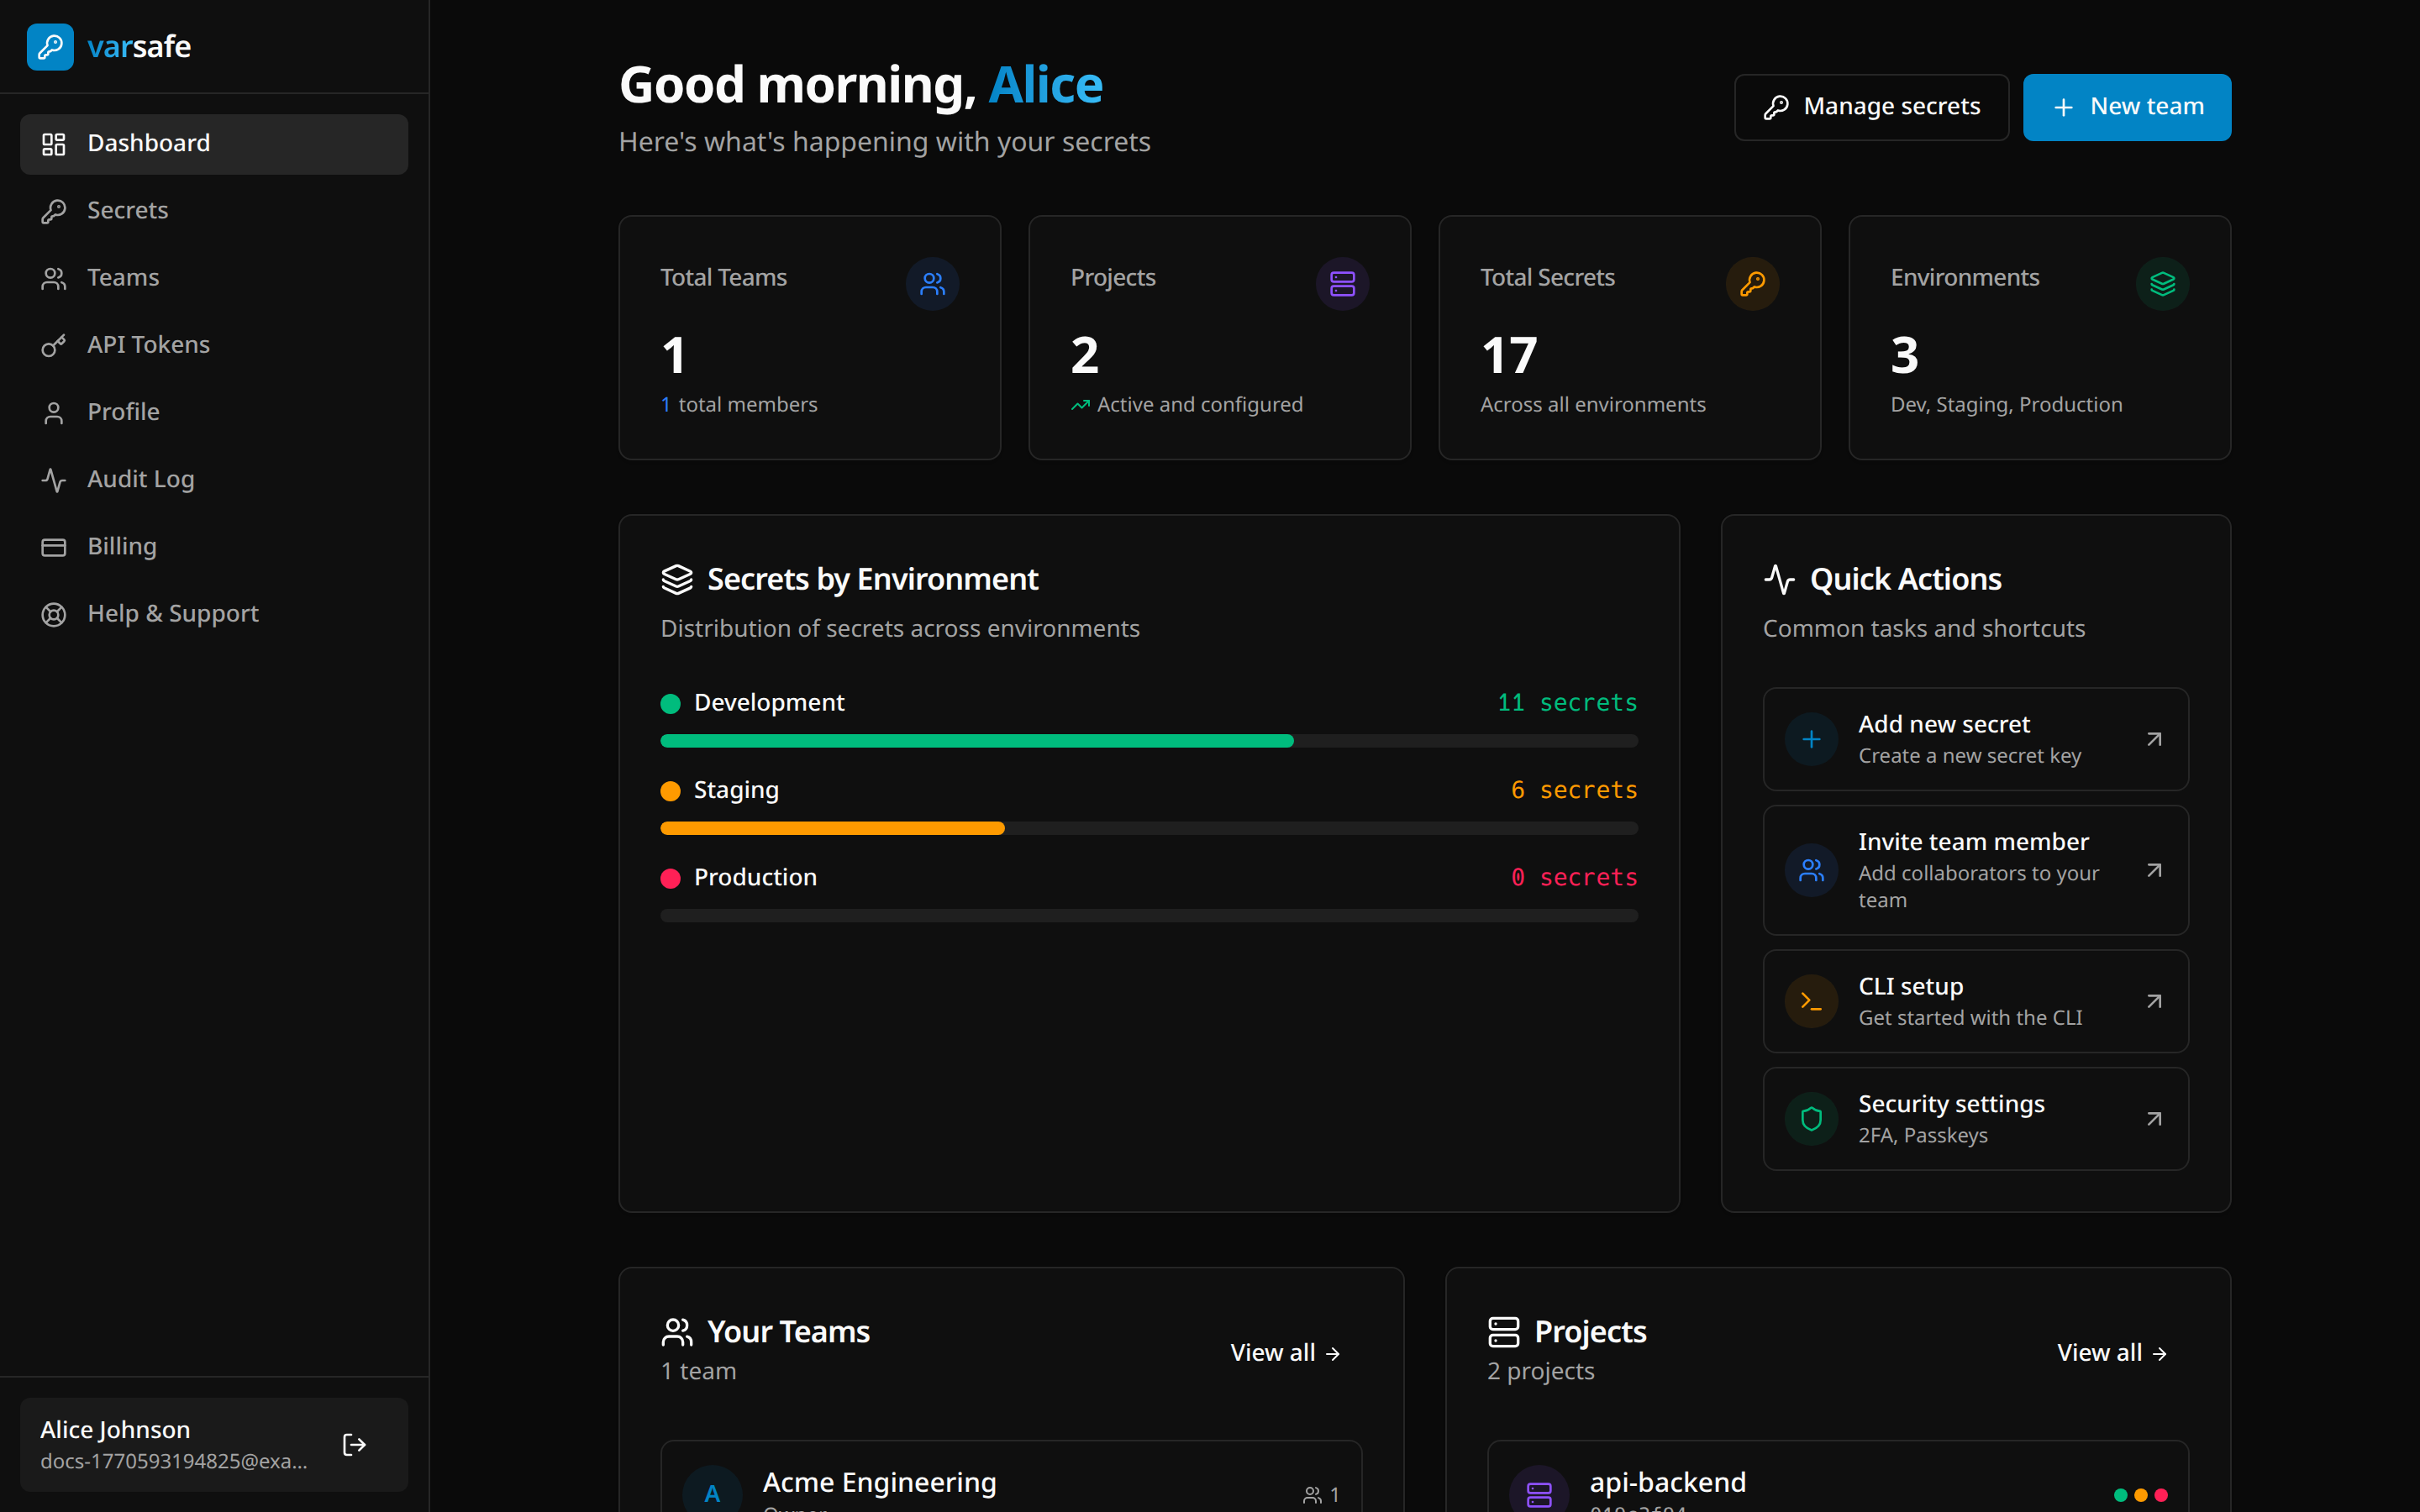 Signing up already created a team, a project, and three environments — which is why the
commands above worked without any setup. You only add more when you outgrow them: another
project per repository, another environment for a QA or demo stage.
| Environment | `-e` slug | Purpose | Protected |
| ----------- | ------------- | ---------------------- | --------- |
| Development | `development` | Local development | No |
| Staging | `staging` | Pre-production testing | No |
| Production | `production` | Live systems | **Yes** |
The slug is what you pass to `-e`, and it is also the address your secrets are stored
under. Renaming an environment is safe; changing its slug re-points everything that
referred to it, including API-token environment allowlists — so treat the slug as fixed
once secrets exist.
**Protected** means writes ask for confirmation: `varsafe set` and `varsafe unset` require
you to type the environment name, or pass `-y` in automation. Production starts protected;
you can protect any environment in its settings.
Two things the dashboard does that the CLI does not:
- **Bulk import** — on the Secrets page, "Add secrets" → "Bulk" takes a pasted or
drag-dropped `.env` file, which is the fastest way to move an existing project in.
- **Seeing everything at once** — every project and environment side by side, plus the
audit trail of who read or changed what.
## Team collaboration
Invite teammates from the Teams page ("Invite member") and assign each a role: owner, admin, developer, operator, viewer, or billing. Roles determine read/write access per environment — production is protected by default, restricting writes to owners and admins. See the [roles reference](/reference/roles) for the full permissions matrix.
## CI/CD integration
For automated pipelines, use an API token instead of a personal session:
1. Go to your team settings in the dashboard
2. Navigate to "API Tokens"
3. Create a new token
4. Add it to your CI/CD secrets as `VARSAFE_API_TOKEN`
```yaml
# GitHub Actions example
- name: Deploy with secrets
run: varsafe run -p my-api -e production -- ./deploy.sh
env:
VARSAFE_API_TOKEN: ${{ secrets.VARSAFE_API_TOKEN }}
```
The CLI picks up `VARSAFE_API_TOKEN` automatically — no `varsafe login` step needed. See [CI/CD usage](/cli#cicd-usage) for GitLab CI and more.
## Next steps
- **[Core concepts](/concepts)** — Understand teams, projects, environments, and injection
- **[CLI reference](/cli)** — Full command reference with examples
- **[Dashboard guide](/guides/dashboard)** — Managing secrets, teams, and audit logs
- **[API tokens](/reference/api-tokens)** — Service accounts for CI/CD pipelines
- **[MCP server](/guides/mcp)** — Connect AI agents like Claude Code and Cursor
- **[Security model](/reference/security)** — How your secrets stay safe
Signing up already created a team, a project, and three environments — which is why the
commands above worked without any setup. You only add more when you outgrow them: another
project per repository, another environment for a QA or demo stage.
| Environment | `-e` slug | Purpose | Protected |
| ----------- | ------------- | ---------------------- | --------- |
| Development | `development` | Local development | No |
| Staging | `staging` | Pre-production testing | No |
| Production | `production` | Live systems | **Yes** |
The slug is what you pass to `-e`, and it is also the address your secrets are stored
under. Renaming an environment is safe; changing its slug re-points everything that
referred to it, including API-token environment allowlists — so treat the slug as fixed
once secrets exist.
**Protected** means writes ask for confirmation: `varsafe set` and `varsafe unset` require
you to type the environment name, or pass `-y` in automation. Production starts protected;
you can protect any environment in its settings.
Two things the dashboard does that the CLI does not:
- **Bulk import** — on the Secrets page, "Add secrets" → "Bulk" takes a pasted or
drag-dropped `.env` file, which is the fastest way to move an existing project in.
- **Seeing everything at once** — every project and environment side by side, plus the
audit trail of who read or changed what.
## Team collaboration
Invite teammates from the Teams page ("Invite member") and assign each a role: owner, admin, developer, operator, viewer, or billing. Roles determine read/write access per environment — production is protected by default, restricting writes to owners and admins. See the [roles reference](/reference/roles) for the full permissions matrix.
## CI/CD integration
For automated pipelines, use an API token instead of a personal session:
1. Go to your team settings in the dashboard
2. Navigate to "API Tokens"
3. Create a new token
4. Add it to your CI/CD secrets as `VARSAFE_API_TOKEN`
```yaml
# GitHub Actions example
- name: Deploy with secrets
run: varsafe run -p my-api -e production -- ./deploy.sh
env:
VARSAFE_API_TOKEN: ${{ secrets.VARSAFE_API_TOKEN }}
```
The CLI picks up `VARSAFE_API_TOKEN` automatically — no `varsafe login` step needed. See [CI/CD usage](/cli#cicd-usage) for GitLab CI and more.
## Next steps
- **[Core concepts](/concepts)** — Understand teams, projects, environments, and injection
- **[CLI reference](/cli)** — Full command reference with examples
- **[Dashboard guide](/guides/dashboard)** — Managing secrets, teams, and audit logs
- **[API tokens](/reference/api-tokens)** — Service accounts for CI/CD pipelines
- **[MCP server](/guides/mcp)** — Connect AI agents like Claude Code and Cursor
- **[Security model](/reference/security)** — How your secrets stay safe