 ## Installation
The CLI is a self-contained binary — it is not published on npm. Six artifacts are published: Linux x64 and arm64, each for glibc and musl, plus macOS x64 and arm64. The installer picks the right one by detecting your architecture and C library. Windows works via WSL.
```bash
curl -fsSL https://varsafe.dev/install.sh | bash
```
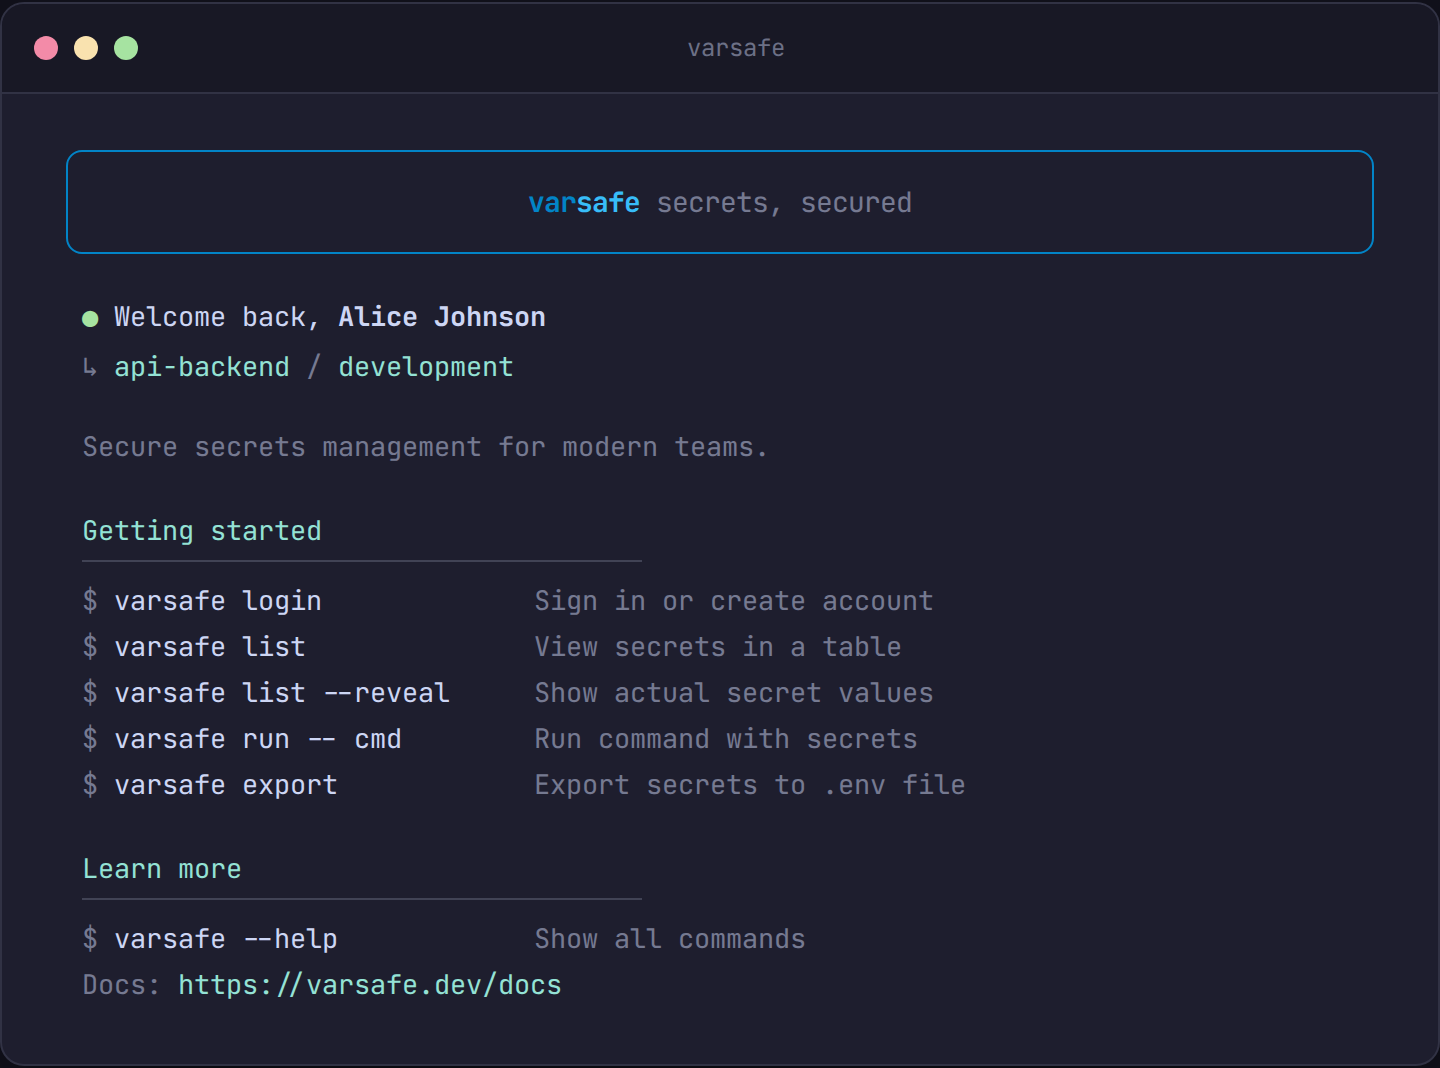
The installer downloads the binary to `~/.varsafe/bin` and adds it to your shell's `PATH`. Verify the install and explore the commands — no account needed:
## Installation
The CLI is a self-contained binary — it is not published on npm. Six artifacts are published: Linux x64 and arm64, each for glibc and musl, plus macOS x64 and arm64. The installer picks the right one by detecting your architecture and C library. Windows works via WSL.
```bash
curl -fsSL https://varsafe.dev/install.sh | bash
```
The installer downloads the binary to `~/.varsafe/bin` and adds it to your shell's `PATH`. Verify the install and explore the commands — no account needed:
 Signing up already created a team, a project, and three environments — which is why the
commands above worked without any setup. You only add more when you outgrow them: another
project per repository, another environment for a QA or demo stage.
| Environment | `-e` slug | Purpose | Protected |
| ----------- | ------------- | ---------------------- | --------- |
| Development | `development` | Local development | No |
| Staging | `staging` | Pre-production testing | No |
| Production | `production` | Live systems | **Yes** |
The slug is what you pass to `-e`, and it is also the address your secrets are stored
under. Renaming an environment is safe; changing its slug re-points everything that
referred to it, including API-token environment allowlists — so treat the slug as fixed
once secrets exist.
**Protected** means writes ask for confirmation: `varsafe set` and `varsafe unset` require
you to type the environment name, or pass `-y` in automation. Production starts protected;
you can protect any environment in its settings.
Two things the dashboard does that the CLI does not:
- **Bulk import** — on the Secrets page, "Add secrets" → "Bulk" takes a pasted or
drag-dropped `.env` file, which is the fastest way to move an existing project in.
- **Seeing everything at once** — every project and environment side by side, plus the
audit trail of who read or changed what.
## Team collaboration
Invite teammates from the Teams page ("Invite member") and assign each a role: owner, admin, developer, operator, viewer, or billing. Roles determine read/write access per environment — production is protected by default, restricting writes to owners and admins. See the [roles reference](/reference/roles) for the full permissions matrix.
## CI/CD integration
For automated pipelines, use an API token instead of a personal session:
1. Go to your team settings in the dashboard
2. Navigate to "API Tokens"
3. Create a new token
4. Add it to your CI/CD secrets as `VARSAFE_API_TOKEN`
```yaml
# GitHub Actions example
- name: Deploy with secrets
run: varsafe run -p my-api -e production -- ./deploy.sh
env:
VARSAFE_API_TOKEN: ${{ secrets.VARSAFE_API_TOKEN }}
```
The CLI picks up `VARSAFE_API_TOKEN` automatically — no `varsafe login` step needed. See [CI/CD usage](/cli#cicd-usage) for GitLab CI and more.
## Next steps
- **[Core concepts](/concepts)** — Understand teams, projects, environments, and injection
- **[CLI reference](/cli)** — Full command reference with examples
- **[Dashboard guide](/guides/dashboard)** — Managing secrets, teams, and audit logs
- **[API tokens](/reference/api-tokens)** — Service accounts for CI/CD pipelines
- **[MCP server](/guides/mcp)** — Connect AI agents like Claude Code and Cursor
- **[Security model](/reference/security)** — How your secrets stay safe
---
# CI/CD Pipelines
Source: https://docs.varsafe.dev/guides/ci
import gitlabCi from '../../examples/config/gitlab-ci-example.yml?raw';
import githubActions from '../../examples/config/github-actions-example.yml?raw';
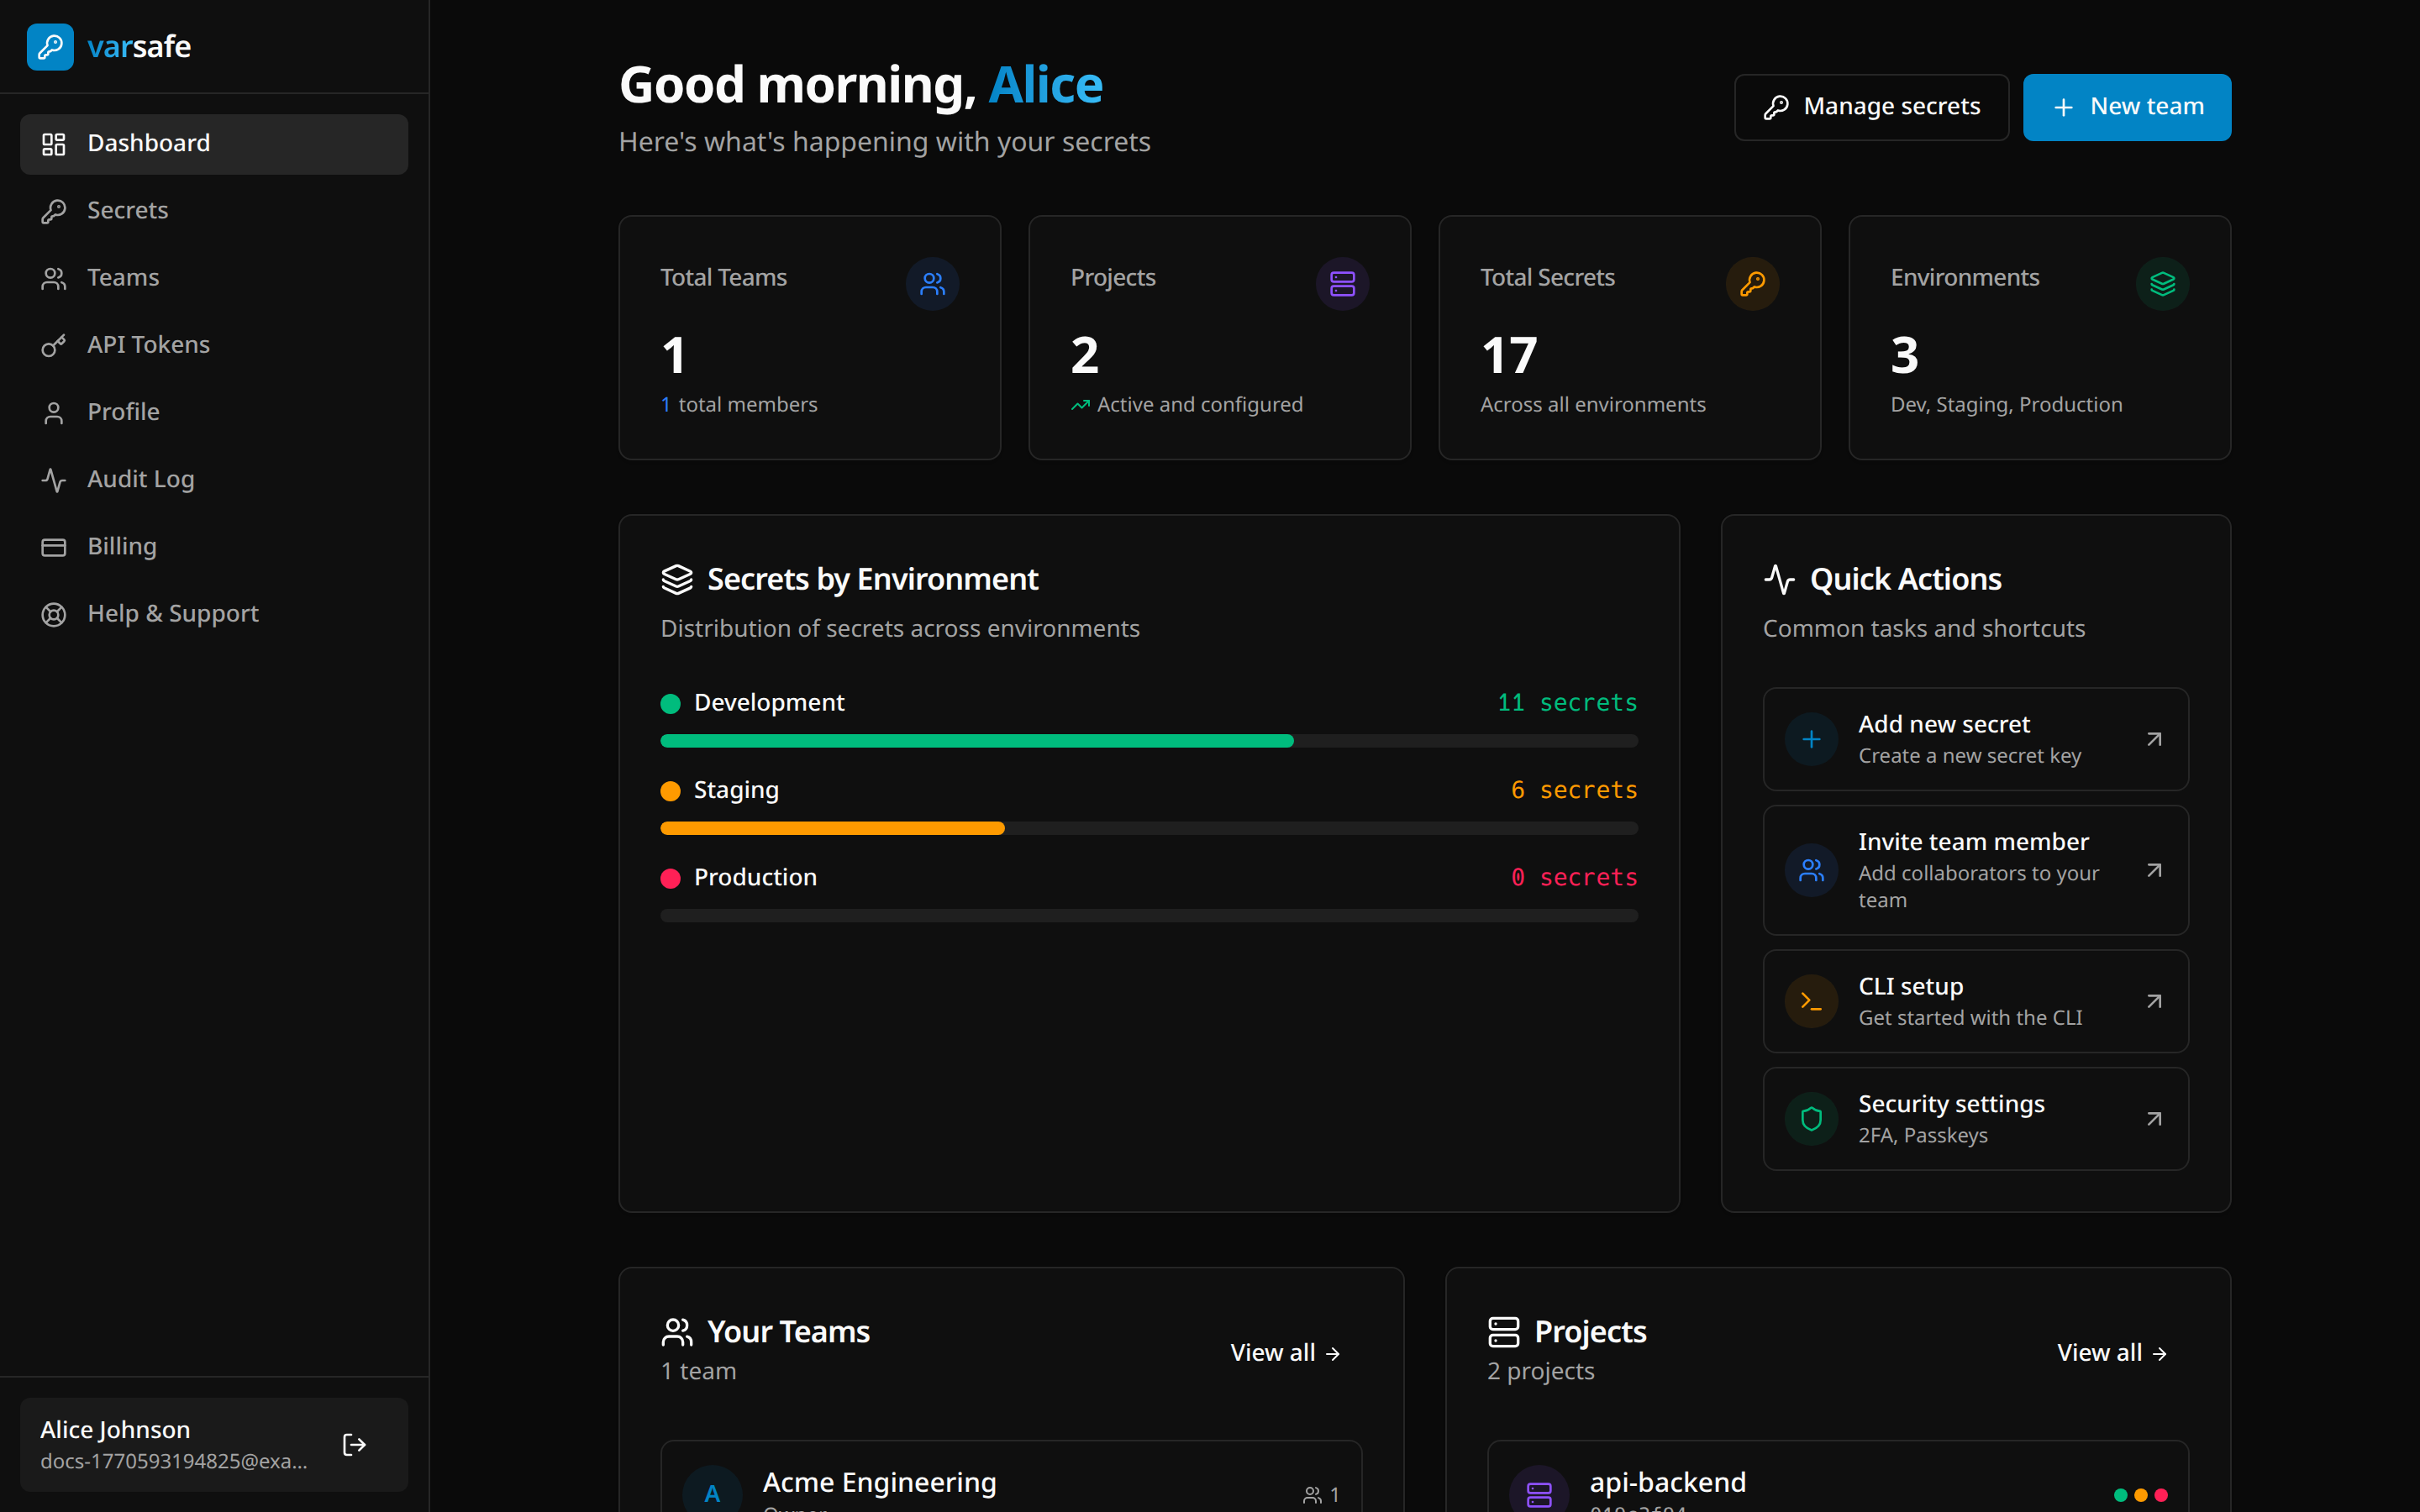
The dashboard has these main sections:
| Section | Purpose |
| -------------- | ------------------------------------------------- |
| **Dashboard** | Overview of teams, projects, and recent activity |
| **Secrets** | View and manage secrets by project/environment |
| **Teams** | Manage teams, members, and projects |
| **API Tokens** | Create and manage tokens for CI/CD and automation |
| **Profile** | Account settings, security, and sessions |
| **Audit Log** | Activity history and compliance exports |
| **Billing** | Subscription and payment management |
| **MCP** | Review and revoke AI agent connections |
---
## Secrets Management
Signing up already created a team, a project, and three environments — which is why the
commands above worked without any setup. You only add more when you outgrow them: another
project per repository, another environment for a QA or demo stage.
| Environment | `-e` slug | Purpose | Protected |
| ----------- | ------------- | ---------------------- | --------- |
| Development | `development` | Local development | No |
| Staging | `staging` | Pre-production testing | No |
| Production | `production` | Live systems | **Yes** |
The slug is what you pass to `-e`, and it is also the address your secrets are stored
under. Renaming an environment is safe; changing its slug re-points everything that
referred to it, including API-token environment allowlists — so treat the slug as fixed
once secrets exist.
**Protected** means writes ask for confirmation: `varsafe set` and `varsafe unset` require
you to type the environment name, or pass `-y` in automation. Production starts protected;
you can protect any environment in its settings.
Two things the dashboard does that the CLI does not:
- **Bulk import** — on the Secrets page, "Add secrets" → "Bulk" takes a pasted or
drag-dropped `.env` file, which is the fastest way to move an existing project in.
- **Seeing everything at once** — every project and environment side by side, plus the
audit trail of who read or changed what.
## Team collaboration
Invite teammates from the Teams page ("Invite member") and assign each a role: owner, admin, developer, operator, viewer, or billing. Roles determine read/write access per environment — production is protected by default, restricting writes to owners and admins. See the [roles reference](/reference/roles) for the full permissions matrix.
## CI/CD integration
For automated pipelines, use an API token instead of a personal session:
1. Go to your team settings in the dashboard
2. Navigate to "API Tokens"
3. Create a new token
4. Add it to your CI/CD secrets as `VARSAFE_API_TOKEN`
```yaml
# GitHub Actions example
- name: Deploy with secrets
run: varsafe run -p my-api -e production -- ./deploy.sh
env:
VARSAFE_API_TOKEN: ${{ secrets.VARSAFE_API_TOKEN }}
```
The CLI picks up `VARSAFE_API_TOKEN` automatically — no `varsafe login` step needed. See [CI/CD usage](/cli#cicd-usage) for GitLab CI and more.
## Next steps
- **[Core concepts](/concepts)** — Understand teams, projects, environments, and injection
- **[CLI reference](/cli)** — Full command reference with examples
- **[Dashboard guide](/guides/dashboard)** — Managing secrets, teams, and audit logs
- **[API tokens](/reference/api-tokens)** — Service accounts for CI/CD pipelines
- **[MCP server](/guides/mcp)** — Connect AI agents like Claude Code and Cursor
- **[Security model](/reference/security)** — How your secrets stay safe
---
# CI/CD Pipelines
Source: https://docs.varsafe.dev/guides/ci
import gitlabCi from '../../examples/config/gitlab-ci-example.yml?raw';
import githubActions from '../../examples/config/github-actions-example.yml?raw';
The dashboard has these main sections:
| Section | Purpose |
| -------------- | ------------------------------------------------- |
| **Dashboard** | Overview of teams, projects, and recent activity |
| **Secrets** | View and manage secrets by project/environment |
| **Teams** | Manage teams, members, and projects |
| **API Tokens** | Create and manage tokens for CI/CD and automation |
| **Profile** | Account settings, security, and sessions |
| **Audit Log** | Activity history and compliance exports |
| **Billing** | Subscription and payment management |
| **MCP** | Review and revoke AI agent connections |
---
## Secrets Management
 ### Viewing Secrets
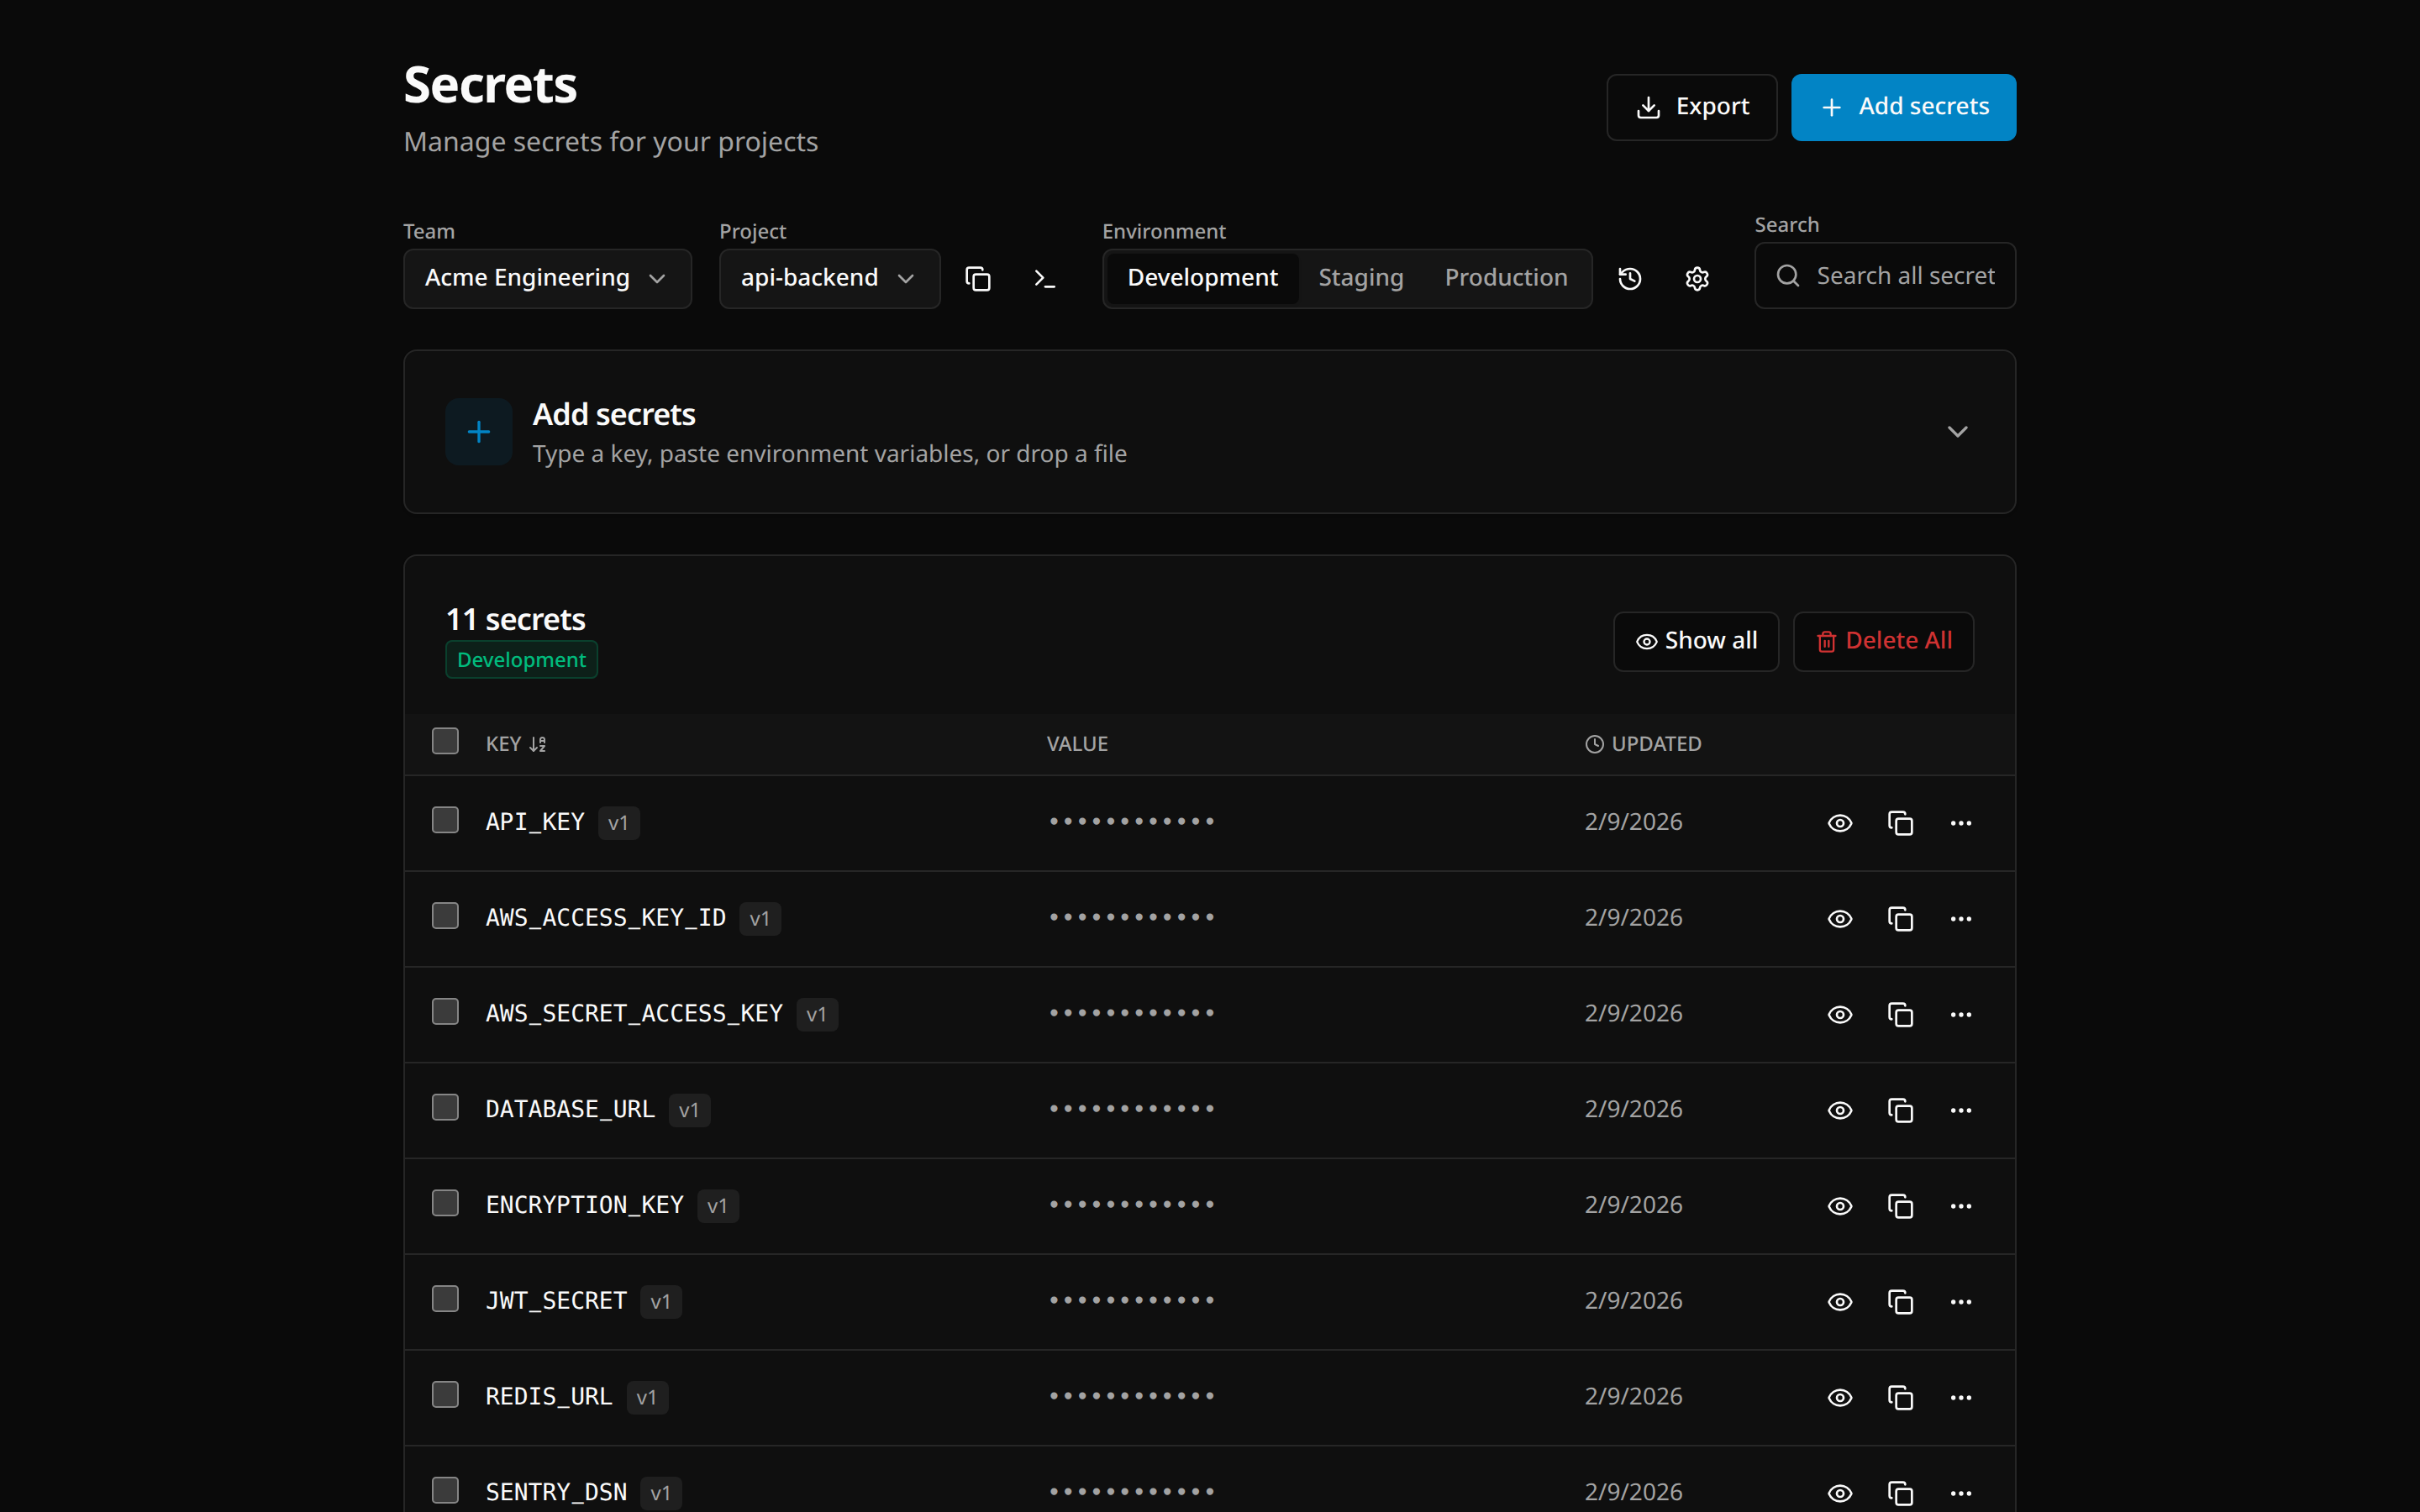
1. Navigate to **Secrets**
2. Select a project from the dropdown
3. Choose an environment tab (Development/Staging/Production/Custom)
Secrets display:
- Key name
- Version number
- Last updated date
- Masked value (click eye icon to reveal)
:::warning
Revealing a secret value is an audited action.
:::
### Adding Secrets
#### Single Secret
1. Click **Add secrets**
2. Select **Single** mode
3. Enter key (automatically uppercased)
4. Enter value
5. Click **Add**
:::tip[Key format]
Must be uppercase letters, numbers, and underscores. Must start with a letter. Example: `DATABASE_URL`, `API_KEY_V2`.
:::
#### Bulk Import
1. Click **Add secrets** → **Bulk**
2. Either:
- Drag and drop a `.env` or `.json` file
- Paste contents directly
3. Review parsed secrets
4. Confirm with the add button — it names the count it parsed, so a malformed file that
yielded fewer secrets than you expected is visible before you commit
### Viewing Secrets
1. Navigate to **Secrets**
2. Select a project from the dropdown
3. Choose an environment tab (Development/Staging/Production/Custom)
Secrets display:
- Key name
- Version number
- Last updated date
- Masked value (click eye icon to reveal)
:::warning
Revealing a secret value is an audited action.
:::
### Adding Secrets
#### Single Secret
1. Click **Add secrets**
2. Select **Single** mode
3. Enter key (automatically uppercased)
4. Enter value
5. Click **Add**
:::tip[Key format]
Must be uppercase letters, numbers, and underscores. Must start with a letter. Example: `DATABASE_URL`, `API_KEY_V2`.
:::
#### Bulk Import
1. Click **Add secrets** → **Bulk**
2. Either:
- Drag and drop a `.env` or `.json` file
- Paste contents directly
3. Review parsed secrets
4. Confirm with the add button — it names the count it parsed, so a malformed file that
yielded fewer secrets than you expected is visible before you commit
 ### Creating a Team
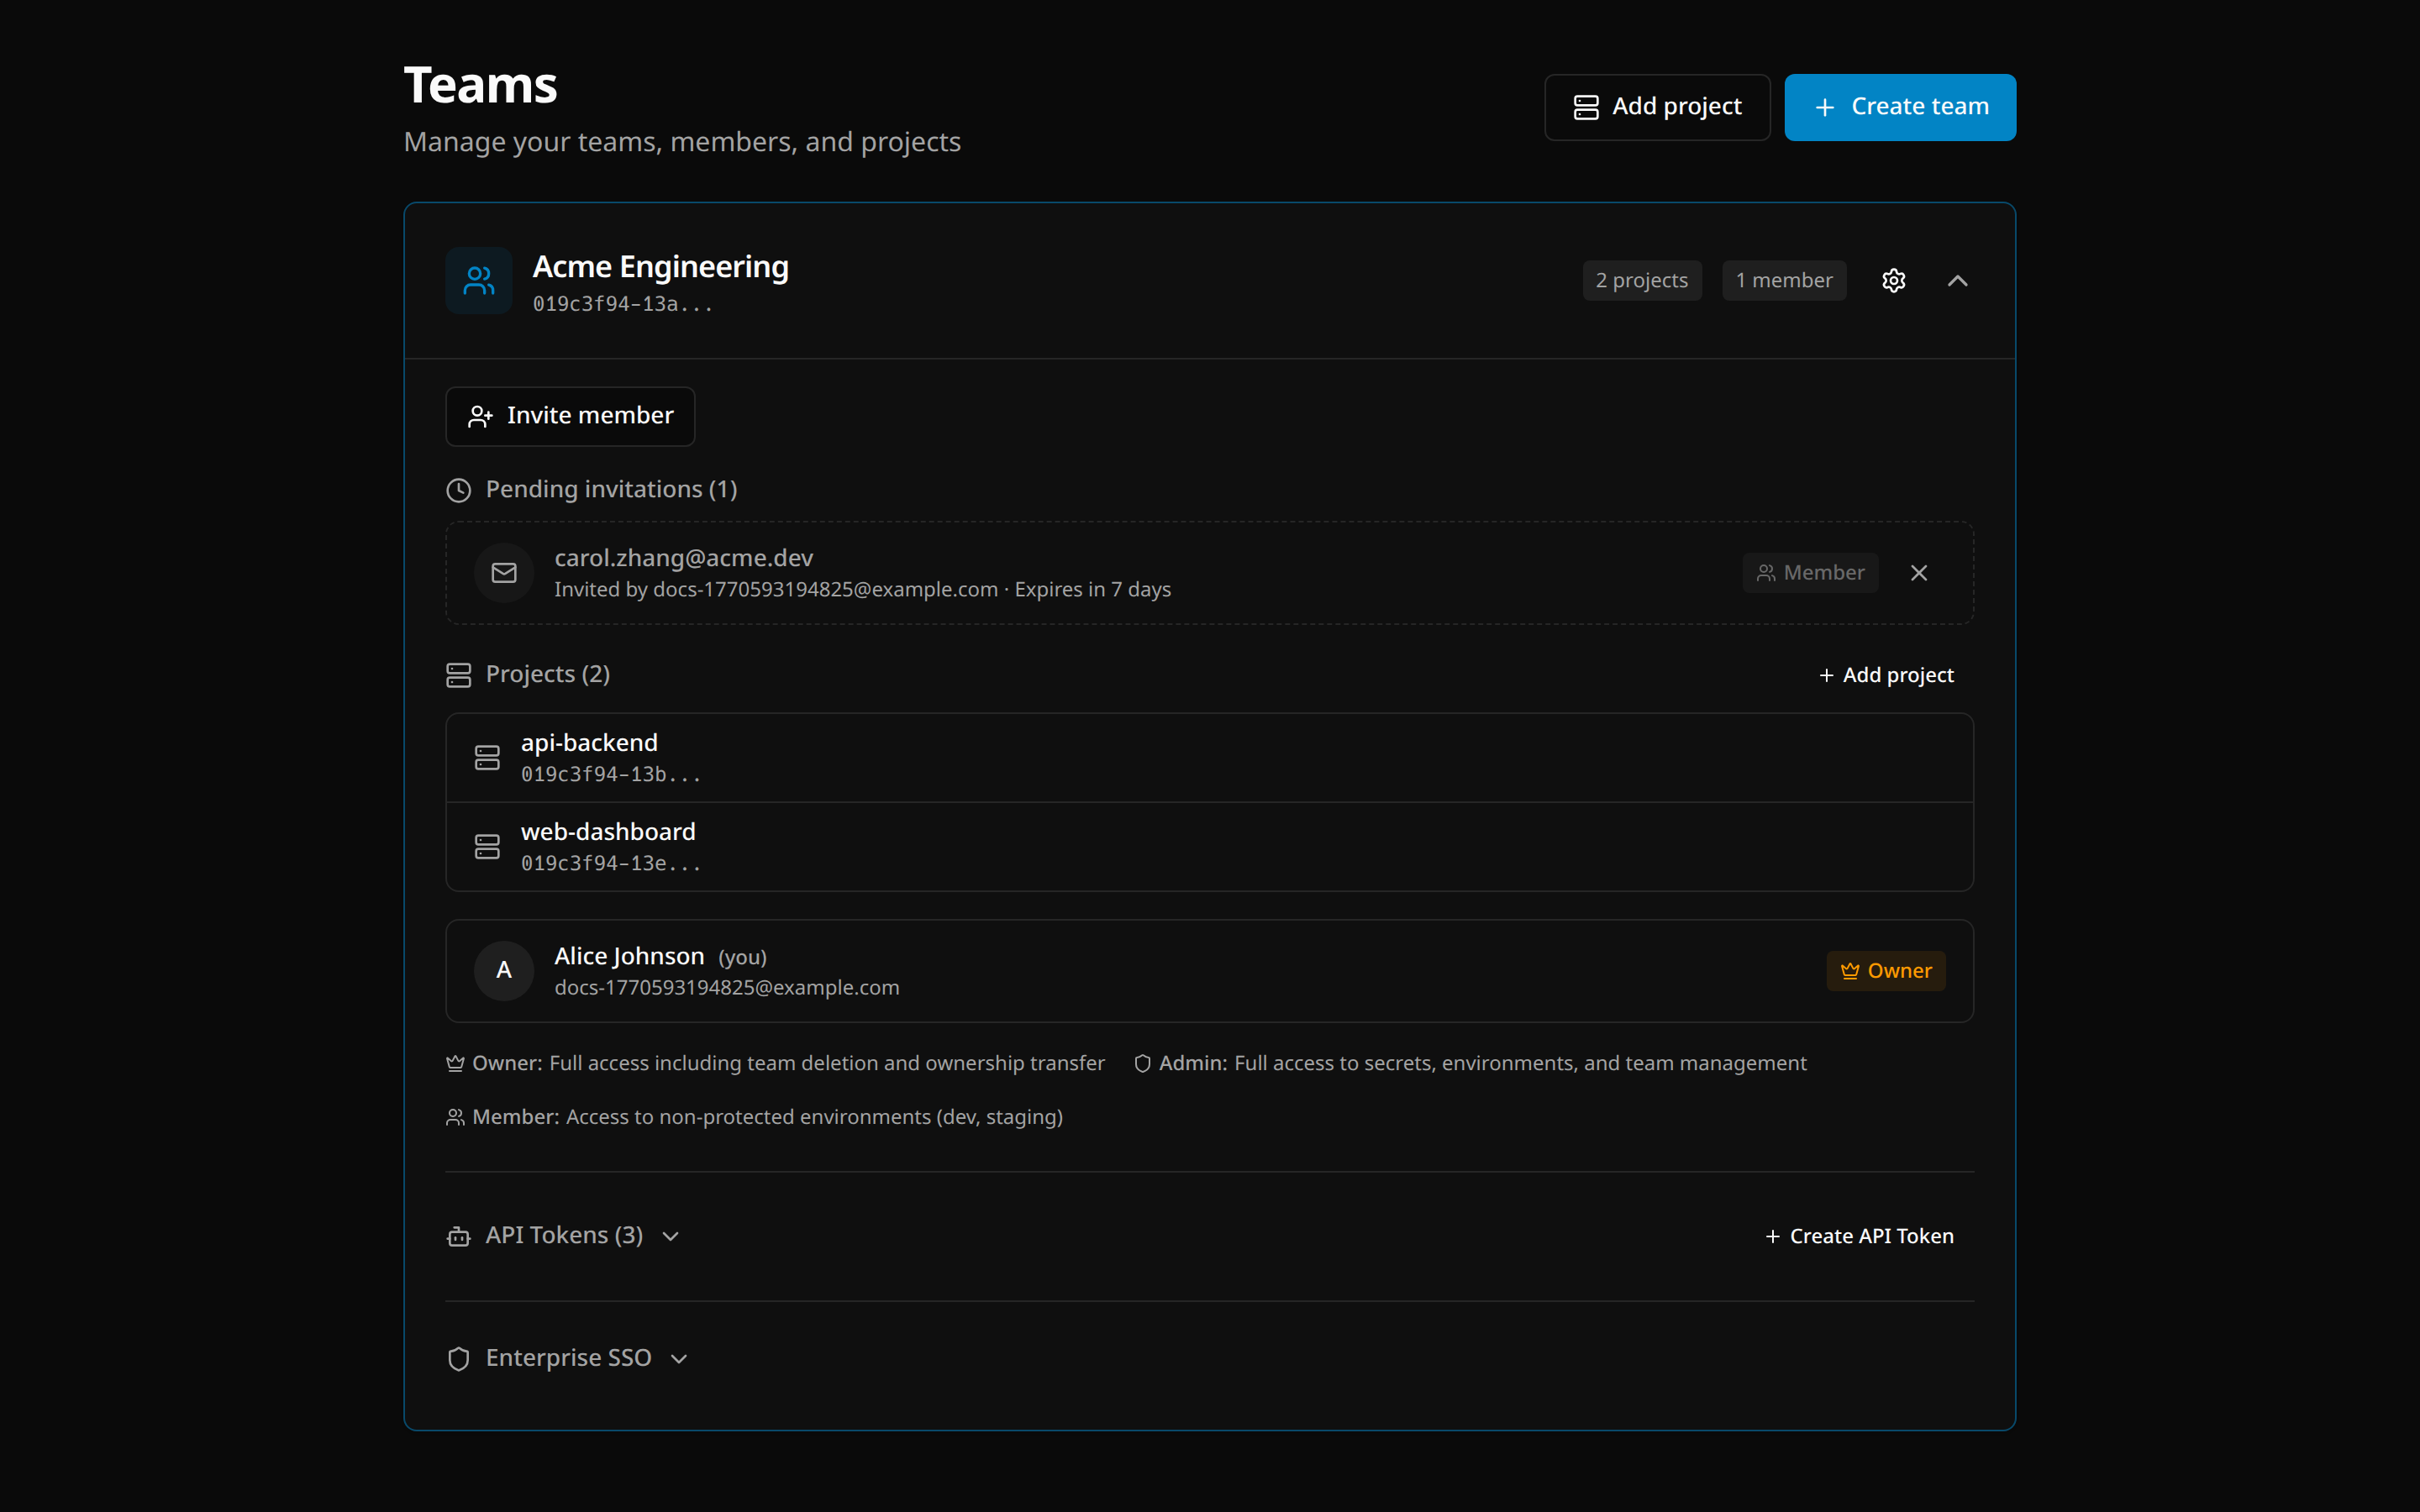
1. Navigate to **Teams**
2. Click **Create team**
3. Enter team name
4. Click **Create**
### Creating a Project
1. Navigate to **Teams**
2. Click **Add project**
3. Select the owning team
4. Enter project name (match your repository name)
5. Click **Create**
### Inviting Members
1. Expand a team by clicking it
2. Click **Invite member**
3. Enter their email address
4. Select a role:
- **Admin** — Manage members and all secrets in all environments
- **Developer** — Read/write secrets in non-protected environments, read-only in protected
- **Operator** — Read-only access to all environments including protected
- **Viewer** — Read-only access to non-protected environments
- **Billing** — Billing management only, no secret access
5. Click **Send invite**
:::info
Invitations expire after a set period. The invitee receives an email with a link to accept.
:::
### Changing Roles
1. Expand a team
2. Click the **...** menu next to a member
3. Select **Change role**
4. Choose the new role
### Deactivating Members
Deactivation soft-disables a member instead of removing them, preserving their audit history and making reactivation easy.
1. Expand a team
2. Click the **...** menu next to a member
3. Select **Deactivate**
Deactivated members:
- Retain their role and audit history
- Have a 7-day grace period where access is preserved
- Cannot access secrets after the grace period
- Do not count toward active member limits after grace period
To **reactivate** a member, click the **...** menu and select **Reactivate**. The member regains full access immediately.
:::info
Owners cannot be deactivated. Transfer ownership first if needed.
:::
### Removing Members
1. Expand a team
2. Click the **...** menu next to a member
3. Select **Remove from team**
4. Confirm removal
### Transferring Ownership
1. Expand a team
2. Click the **...** menu next to a member
3. Select **Transfer ownership**
4. Confirm transfer
:::warning
Only one owner per team. The current owner becomes an admin after transfer.
:::
---
## API Tokens
API tokens enable programmatic access for CI/CD pipelines and automation.
### Creating a Token
1. Go to **API Tokens** in the sidebar
2. Select the team the token should belong to — tokens are scoped to a single team
3. Click **Create API Token**
4. Enter a descriptive name (e.g. the pipeline that will use it)
5. Click **Create**
6. **Copy the token immediately** — It won't be shown again
### Using Tokens
Set the `VARSAFE_API_TOKEN` environment variable (or `VARSAFE_TOKEN` as an alias):
```bash
export VARSAFE_API_TOKEN=vs_at_xxxxxxxxxxxxx
varsafe run -p my-api -e production -- ./deploy.sh
```
Or in CI/CD:
```yaml
env:
VARSAFE_API_TOKEN: ${{ secrets.VARSAFE_API_TOKEN }}
```
### Rotating Tokens
1. Click **Rotate** next to a token
2. A new token is generated
3. Copy the new token
4. Update your CI/CD secrets
The old token is immediately invalidated.
### Revoking Tokens
1. Click **Revoke** next to a token
2. Confirm revocation
The token stops working immediately.
---
## Security Settings
### Creating a Team
1. Navigate to **Teams**
2. Click **Create team**
3. Enter team name
4. Click **Create**
### Creating a Project
1. Navigate to **Teams**
2. Click **Add project**
3. Select the owning team
4. Enter project name (match your repository name)
5. Click **Create**
### Inviting Members
1. Expand a team by clicking it
2. Click **Invite member**
3. Enter their email address
4. Select a role:
- **Admin** — Manage members and all secrets in all environments
- **Developer** — Read/write secrets in non-protected environments, read-only in protected
- **Operator** — Read-only access to all environments including protected
- **Viewer** — Read-only access to non-protected environments
- **Billing** — Billing management only, no secret access
5. Click **Send invite**
:::info
Invitations expire after a set period. The invitee receives an email with a link to accept.
:::
### Changing Roles
1. Expand a team
2. Click the **...** menu next to a member
3. Select **Change role**
4. Choose the new role
### Deactivating Members
Deactivation soft-disables a member instead of removing them, preserving their audit history and making reactivation easy.
1. Expand a team
2. Click the **...** menu next to a member
3. Select **Deactivate**
Deactivated members:
- Retain their role and audit history
- Have a 7-day grace period where access is preserved
- Cannot access secrets after the grace period
- Do not count toward active member limits after grace period
To **reactivate** a member, click the **...** menu and select **Reactivate**. The member regains full access immediately.
:::info
Owners cannot be deactivated. Transfer ownership first if needed.
:::
### Removing Members
1. Expand a team
2. Click the **...** menu next to a member
3. Select **Remove from team**
4. Confirm removal
### Transferring Ownership
1. Expand a team
2. Click the **...** menu next to a member
3. Select **Transfer ownership**
4. Confirm transfer
:::warning
Only one owner per team. The current owner becomes an admin after transfer.
:::
---
## API Tokens
API tokens enable programmatic access for CI/CD pipelines and automation.
### Creating a Token
1. Go to **API Tokens** in the sidebar
2. Select the team the token should belong to — tokens are scoped to a single team
3. Click **Create API Token**
4. Enter a descriptive name (e.g. the pipeline that will use it)
5. Click **Create**
6. **Copy the token immediately** — It won't be shown again
### Using Tokens
Set the `VARSAFE_API_TOKEN` environment variable (or `VARSAFE_TOKEN` as an alias):
```bash
export VARSAFE_API_TOKEN=vs_at_xxxxxxxxxxxxx
varsafe run -p my-api -e production -- ./deploy.sh
```
Or in CI/CD:
```yaml
env:
VARSAFE_API_TOKEN: ${{ secrets.VARSAFE_API_TOKEN }}
```
### Rotating Tokens
1. Click **Rotate** next to a token
2. A new token is generated
3. Copy the new token
4. Update your CI/CD secrets
The old token is immediately invalidated.
### Revoking Tokens
1. Click **Revoke** next to a token
2. Confirm revocation
The token stops working immediately.
---
## Security Settings
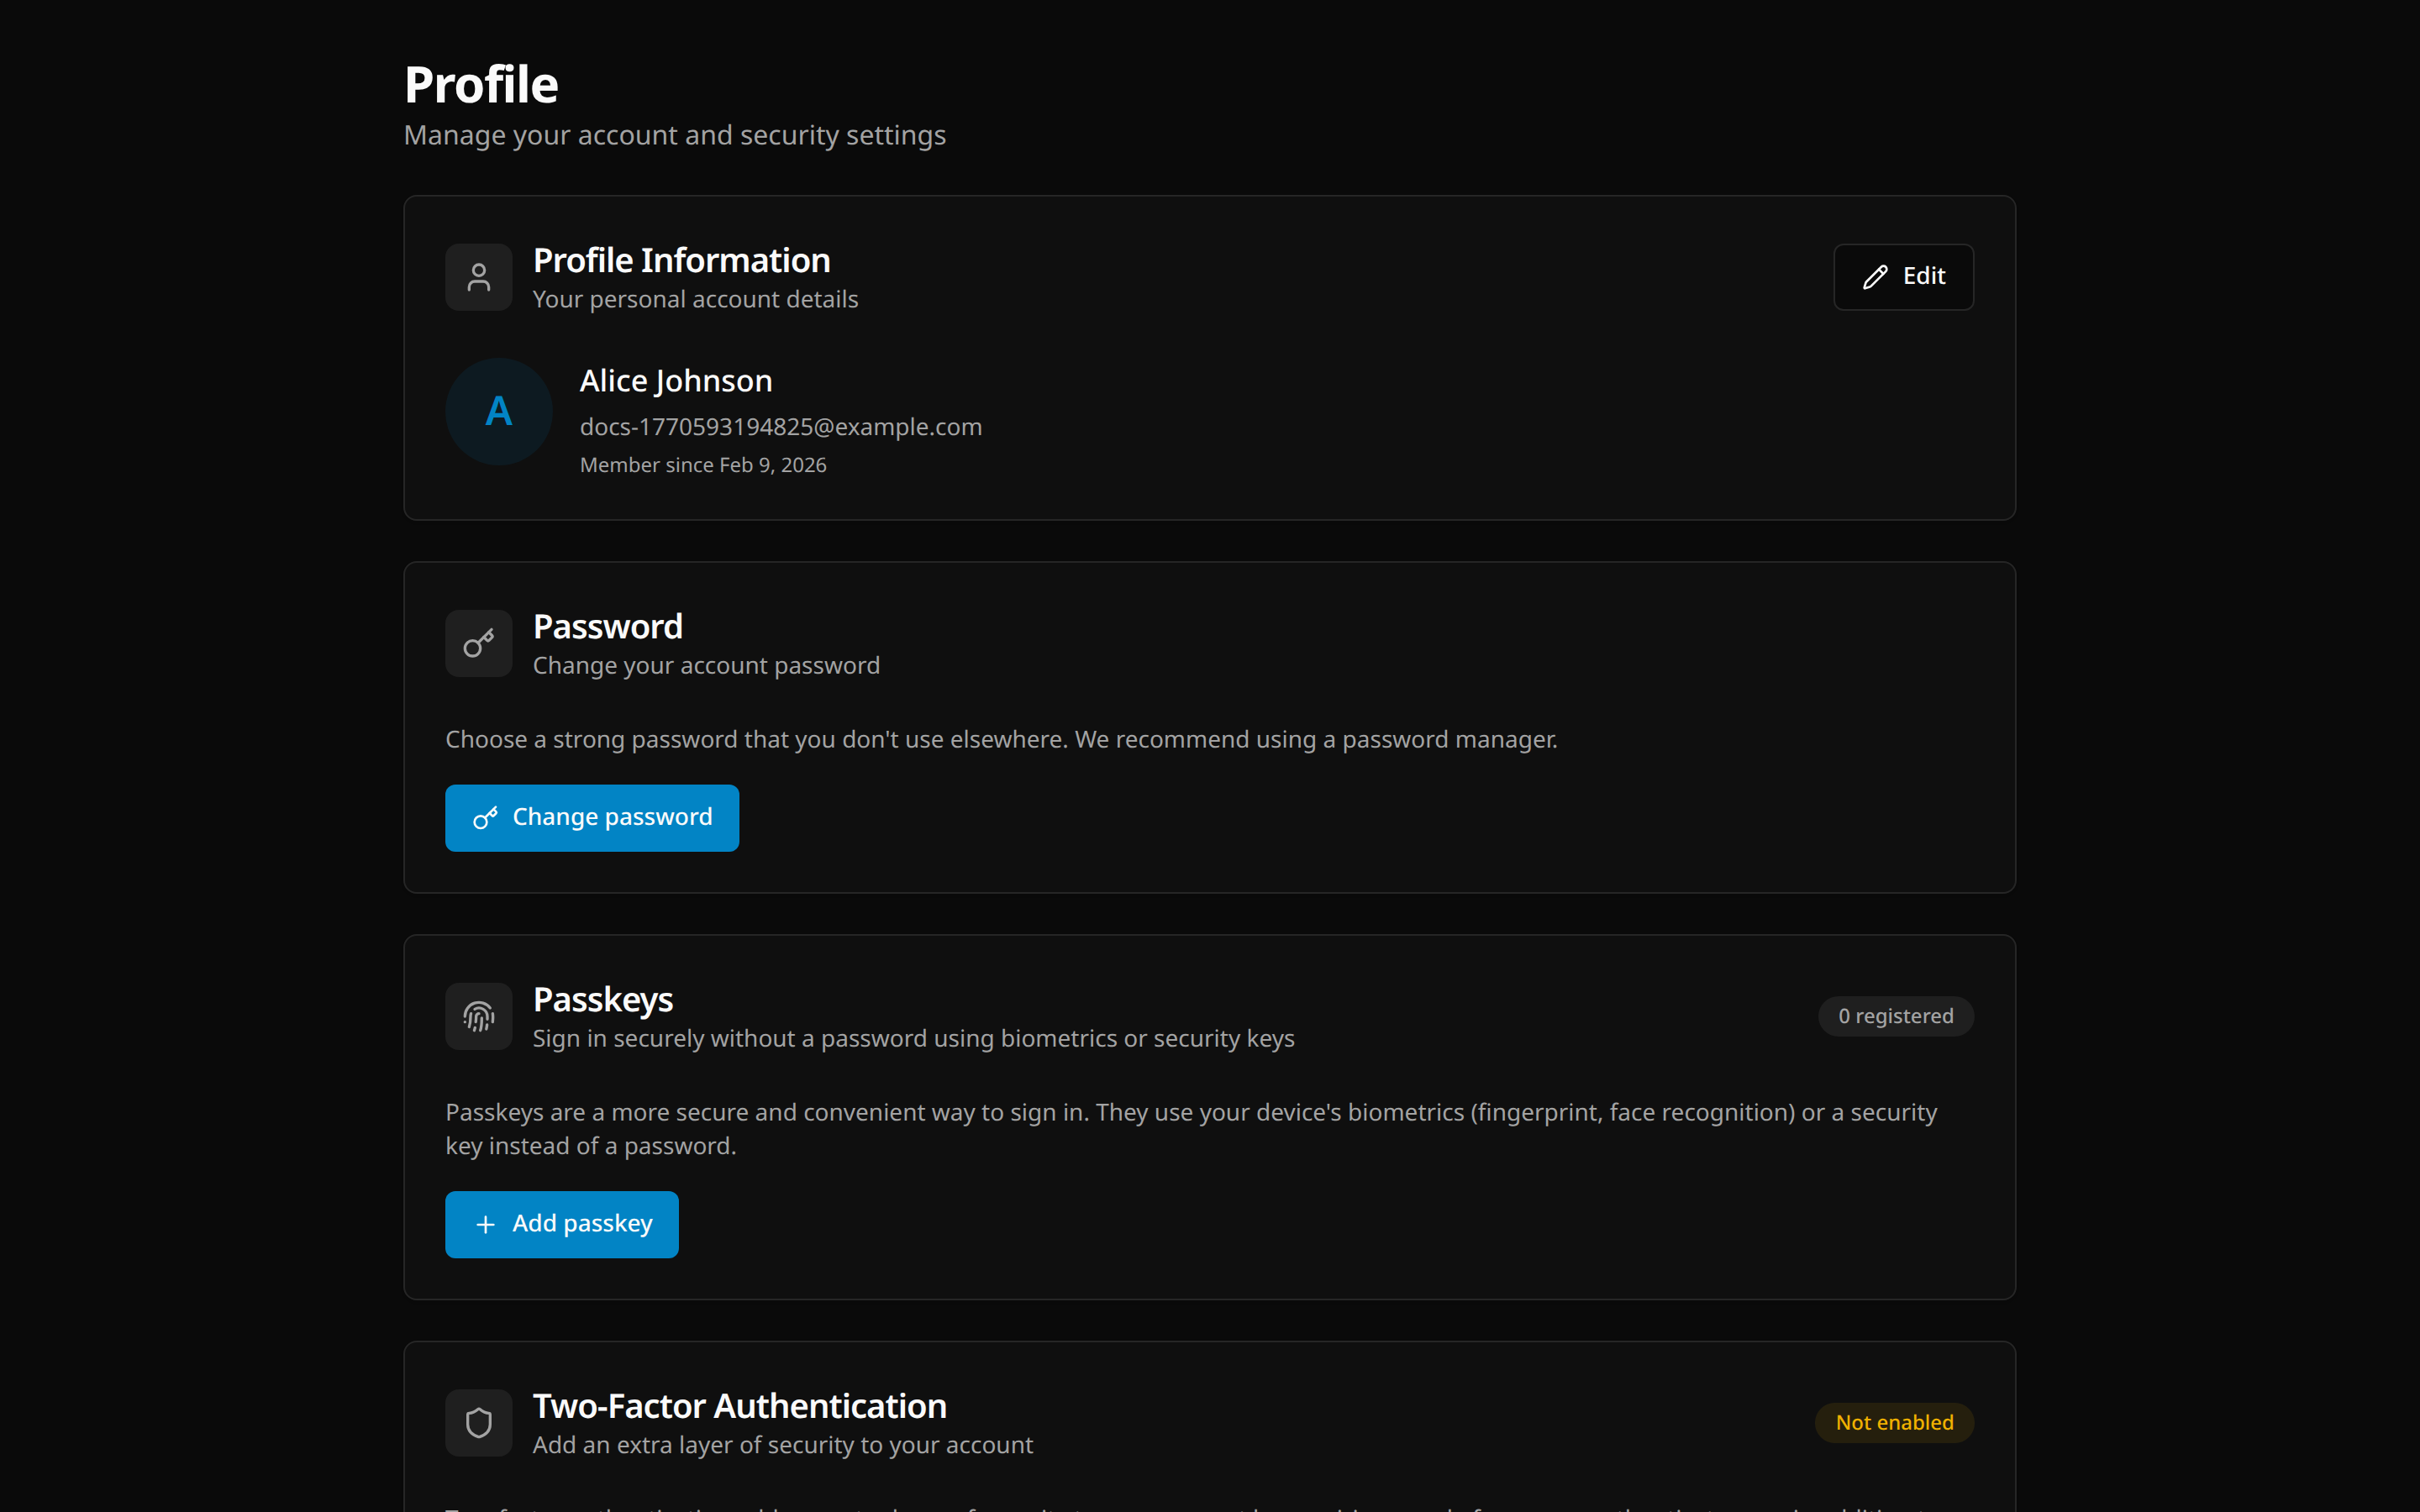 ### Two-Factor Authentication (2FA)
1. Navigate to **Profile** → **Security**
2. Click **Enable 2FA**
3. Enter your password
4. Scan the QR code with your authenticator app
5. Enter the verification code
6. Save your backup codes securely
### Passkeys
Passkeys provide passwordless authentication using biometrics or security keys.
1. Navigate to **Profile** → **Security**
2. Click **Add passkey**
3. Give it a name (e.g., "MacBook Pro Touch ID")
4. Follow your browser's prompts
5. Confirm with biometrics or security key
### Session Management
View and manage active sessions:
1. Navigate to **Profile** → **Security**
2. See all active sessions with:
- Device/browser info
- IP address
- Last active time
3. Click **Revoke** to end a session immediately
---
## Audit Log
### Two-Factor Authentication (2FA)
1. Navigate to **Profile** → **Security**
2. Click **Enable 2FA**
3. Enter your password
4. Scan the QR code with your authenticator app
5. Enter the verification code
6. Save your backup codes securely
### Passkeys
Passkeys provide passwordless authentication using biometrics or security keys.
1. Navigate to **Profile** → **Security**
2. Click **Add passkey**
3. Give it a name (e.g., "MacBook Pro Touch ID")
4. Follow your browser's prompts
5. Confirm with biometrics or security key
### Session Management
View and manage active sessions:
1. Navigate to **Profile** → **Security**
2. See all active sessions with:
- Device/browser info
- IP address
- Last active time
3. Click **Revoke** to end a session immediately
---
## Audit Log
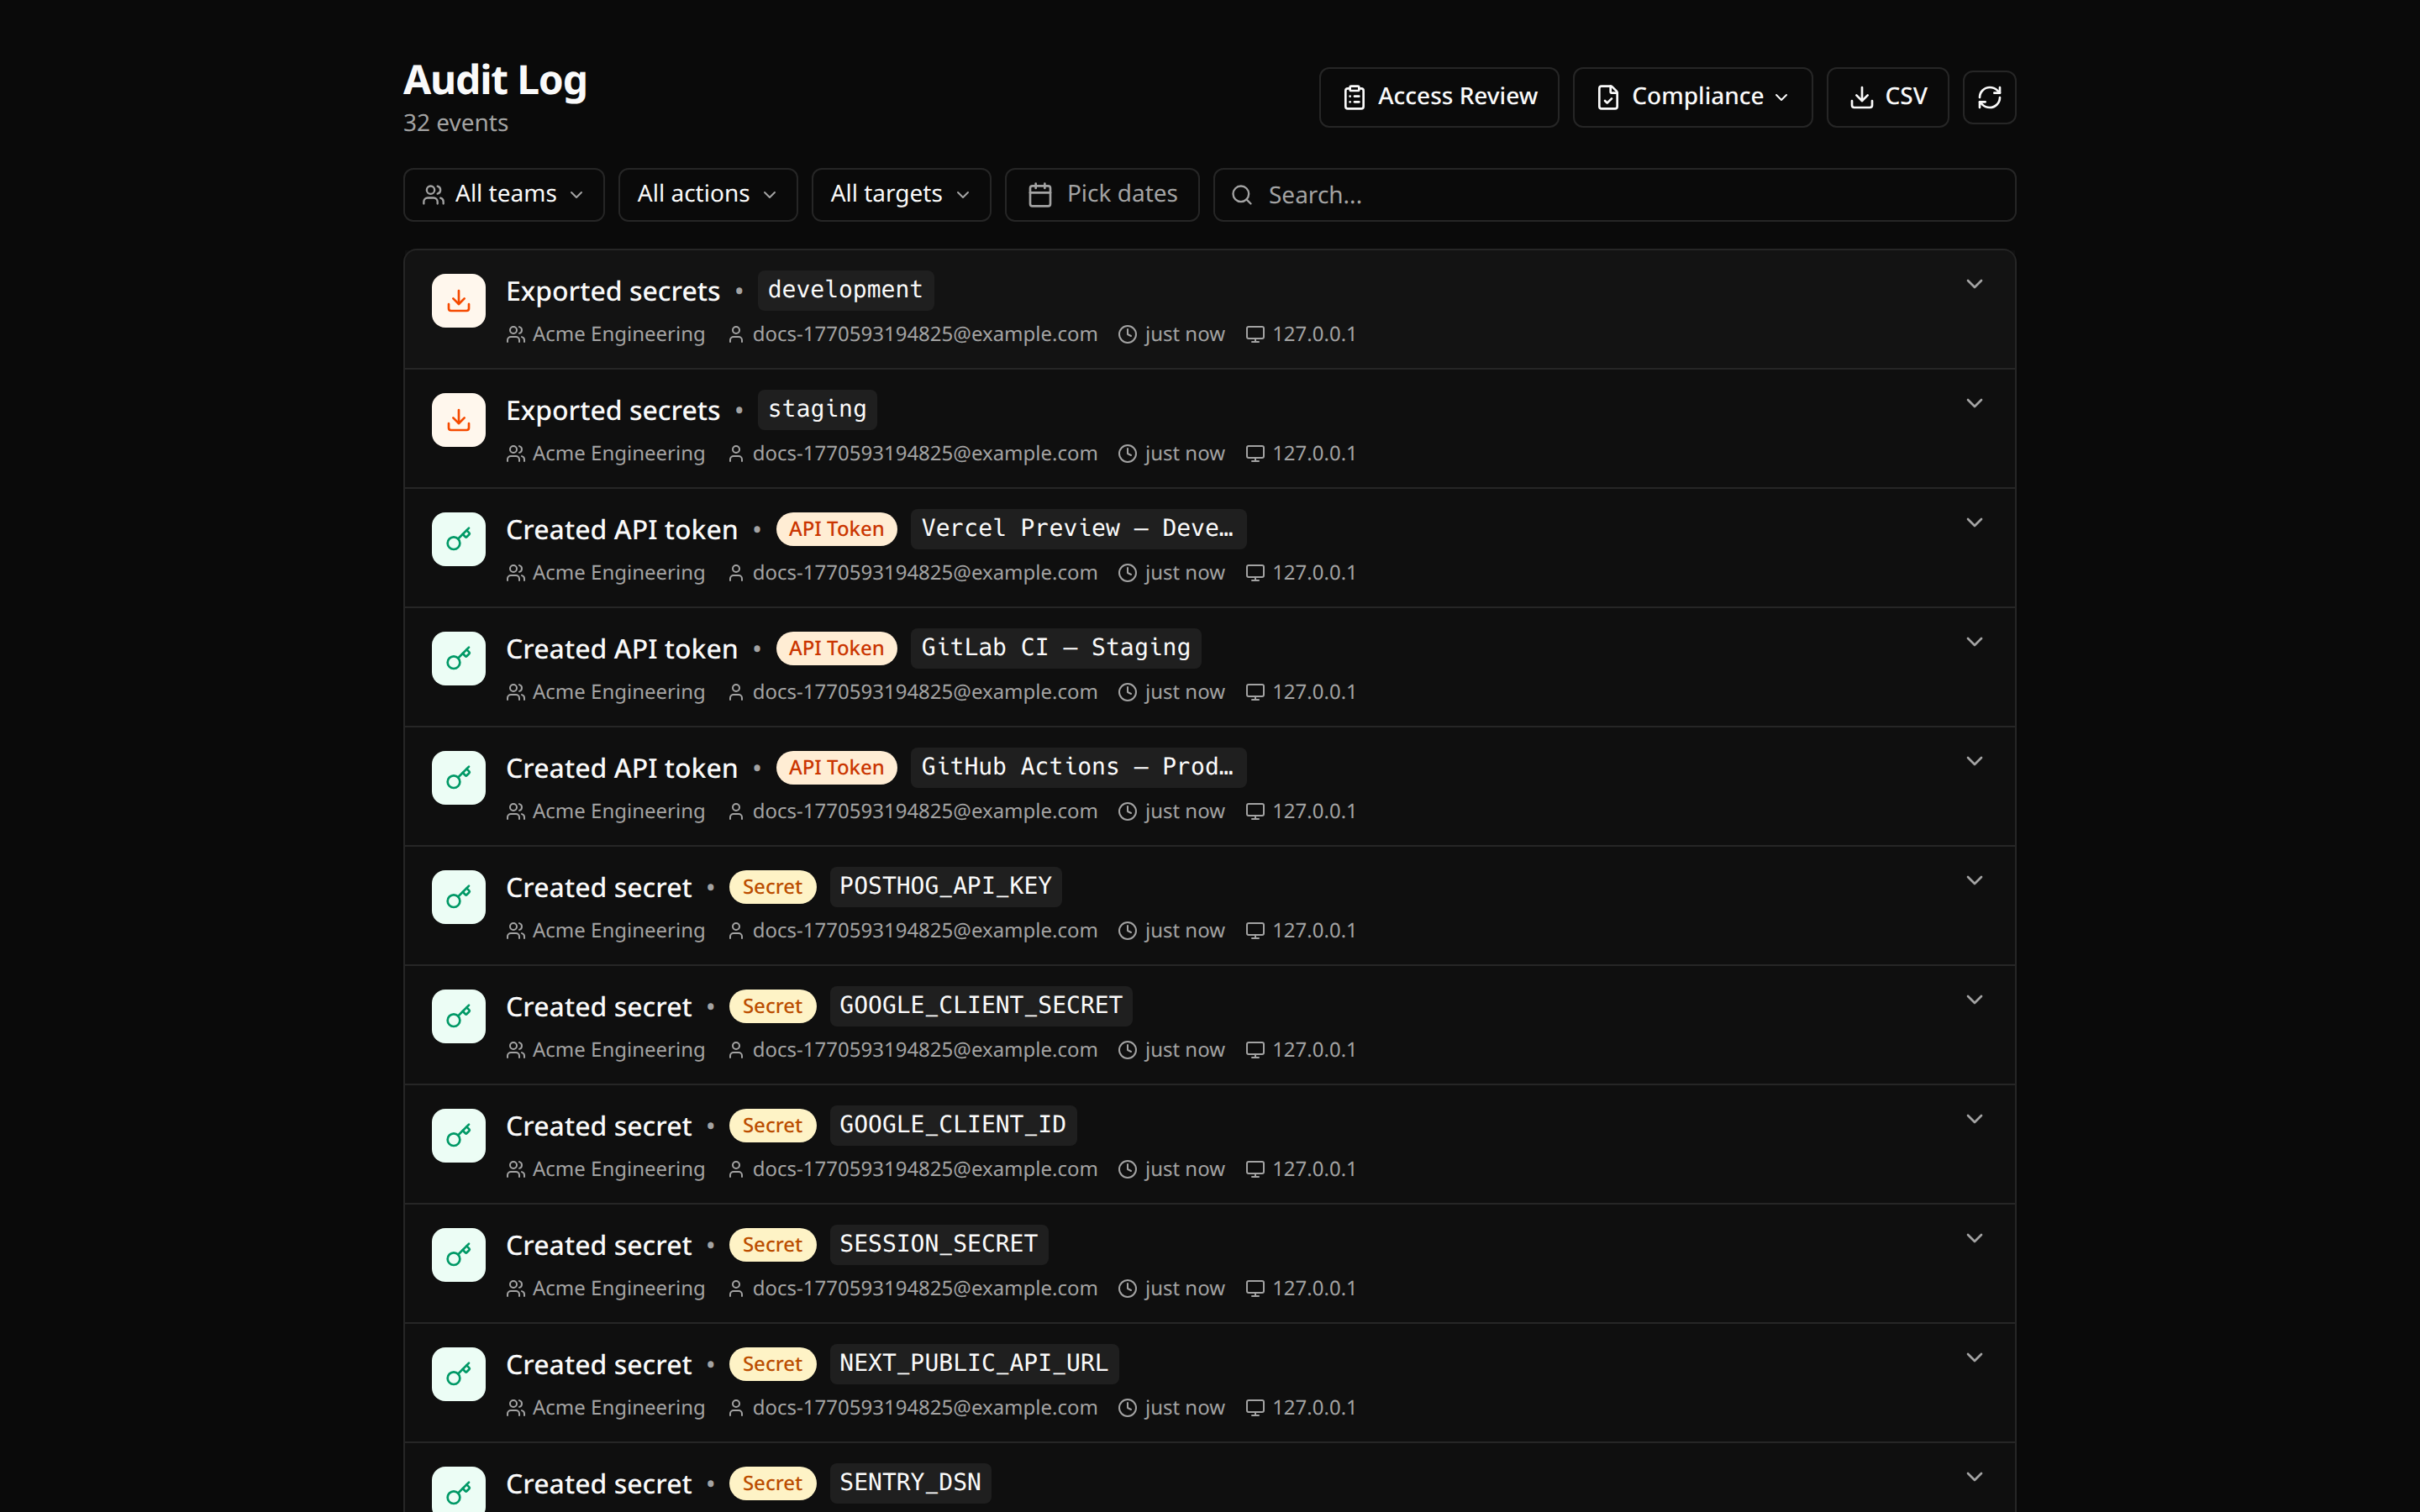 ### Viewing Activity
1. Navigate to **Audit Log**
2. Use filters:
- Search by email, action, or target
- Filter by action type
- Filter by target type
- Set date range
### Understanding Events
Each event shows:
- **Action** (e.g., "Created secret", "Signed in")
- **Actor** (who performed the action)
- **Target** (what was affected)
- **Source** (dashboard, CLI, or API token)
- **Timestamp**
- **IP address**
Click an event to expand details.
### Tracked Actions
| Category | Actions |
| ------------ | -------------------------------------------------------- |
| Auth | Login, logout, failed login, 2FA events, passkey events |
| Secrets | Create, update, delete, access, export, rotate, rollback |
| Teams | Create, update, invite, remove member, role change |
| Projects | Create, update, delete |
| Environments | Create, update, delete |
| Tokens | Create, rotate, revoke |
### Exporting for Compliance
1. Click **Export** dropdown
2. Choose format:
- **CSV** — General export
- **SOC 2** — Security audit trail
- **GDPR** — Processing activities record
- **HIPAA** — Access controls audit
---
## Billing & Plans
### Plans
| Feature | Developer (Free) | Team |
| ----------------- | ------------------ | -------------- |
| Team members | 3 free, up to 25 | Unlimited |
| Projects | Unlimited | Unlimited |
| Environments | Unlimited | Unlimited |
| Audit retention | 7 days | 90 days |
| Role-based access | Developer only | 6 roles |
| Price | $0 + $6/extra user | $15/user/month |
### Upgrading
1. Navigate to **Billing**
2. Click **Upgrade to Team**
3. Start your 14-day free trial
4. Add payment method before trial ends
### Managing Subscription
1. Navigate to **Billing**
2. View current plan and usage
3. Manage payment methods
4. View invoice history
---
# Docker
Source: https://docs.varsafe.dev/guides/docker
import dockerfileExample from '../../examples/config/Dockerfile.example?raw';
import composeExample from '../../examples/config/compose-example.yaml?raw';
### Viewing Activity
1. Navigate to **Audit Log**
2. Use filters:
- Search by email, action, or target
- Filter by action type
- Filter by target type
- Set date range
### Understanding Events
Each event shows:
- **Action** (e.g., "Created secret", "Signed in")
- **Actor** (who performed the action)
- **Target** (what was affected)
- **Source** (dashboard, CLI, or API token)
- **Timestamp**
- **IP address**
Click an event to expand details.
### Tracked Actions
| Category | Actions |
| ------------ | -------------------------------------------------------- |
| Auth | Login, logout, failed login, 2FA events, passkey events |
| Secrets | Create, update, delete, access, export, rotate, rollback |
| Teams | Create, update, invite, remove member, role change |
| Projects | Create, update, delete |
| Environments | Create, update, delete |
| Tokens | Create, rotate, revoke |
### Exporting for Compliance
1. Click **Export** dropdown
2. Choose format:
- **CSV** — General export
- **SOC 2** — Security audit trail
- **GDPR** — Processing activities record
- **HIPAA** — Access controls audit
---
## Billing & Plans
### Plans
| Feature | Developer (Free) | Team |
| ----------------- | ------------------ | -------------- |
| Team members | 3 free, up to 25 | Unlimited |
| Projects | Unlimited | Unlimited |
| Environments | Unlimited | Unlimited |
| Audit retention | 7 days | 90 days |
| Role-based access | Developer only | 6 roles |
| Price | $0 + $6/extra user | $15/user/month |
### Upgrading
1. Navigate to **Billing**
2. Click **Upgrade to Team**
3. Start your 14-day free trial
4. Add payment method before trial ends
### Managing Subscription
1. Navigate to **Billing**
2. View current plan and usage
3. Manage payment methods
4. View invoice history
---
# Docker
Source: https://docs.varsafe.dev/guides/docker
import dockerfileExample from '../../examples/config/Dockerfile.example?raw';
import composeExample from '../../examples/config/compose-example.yaml?raw';
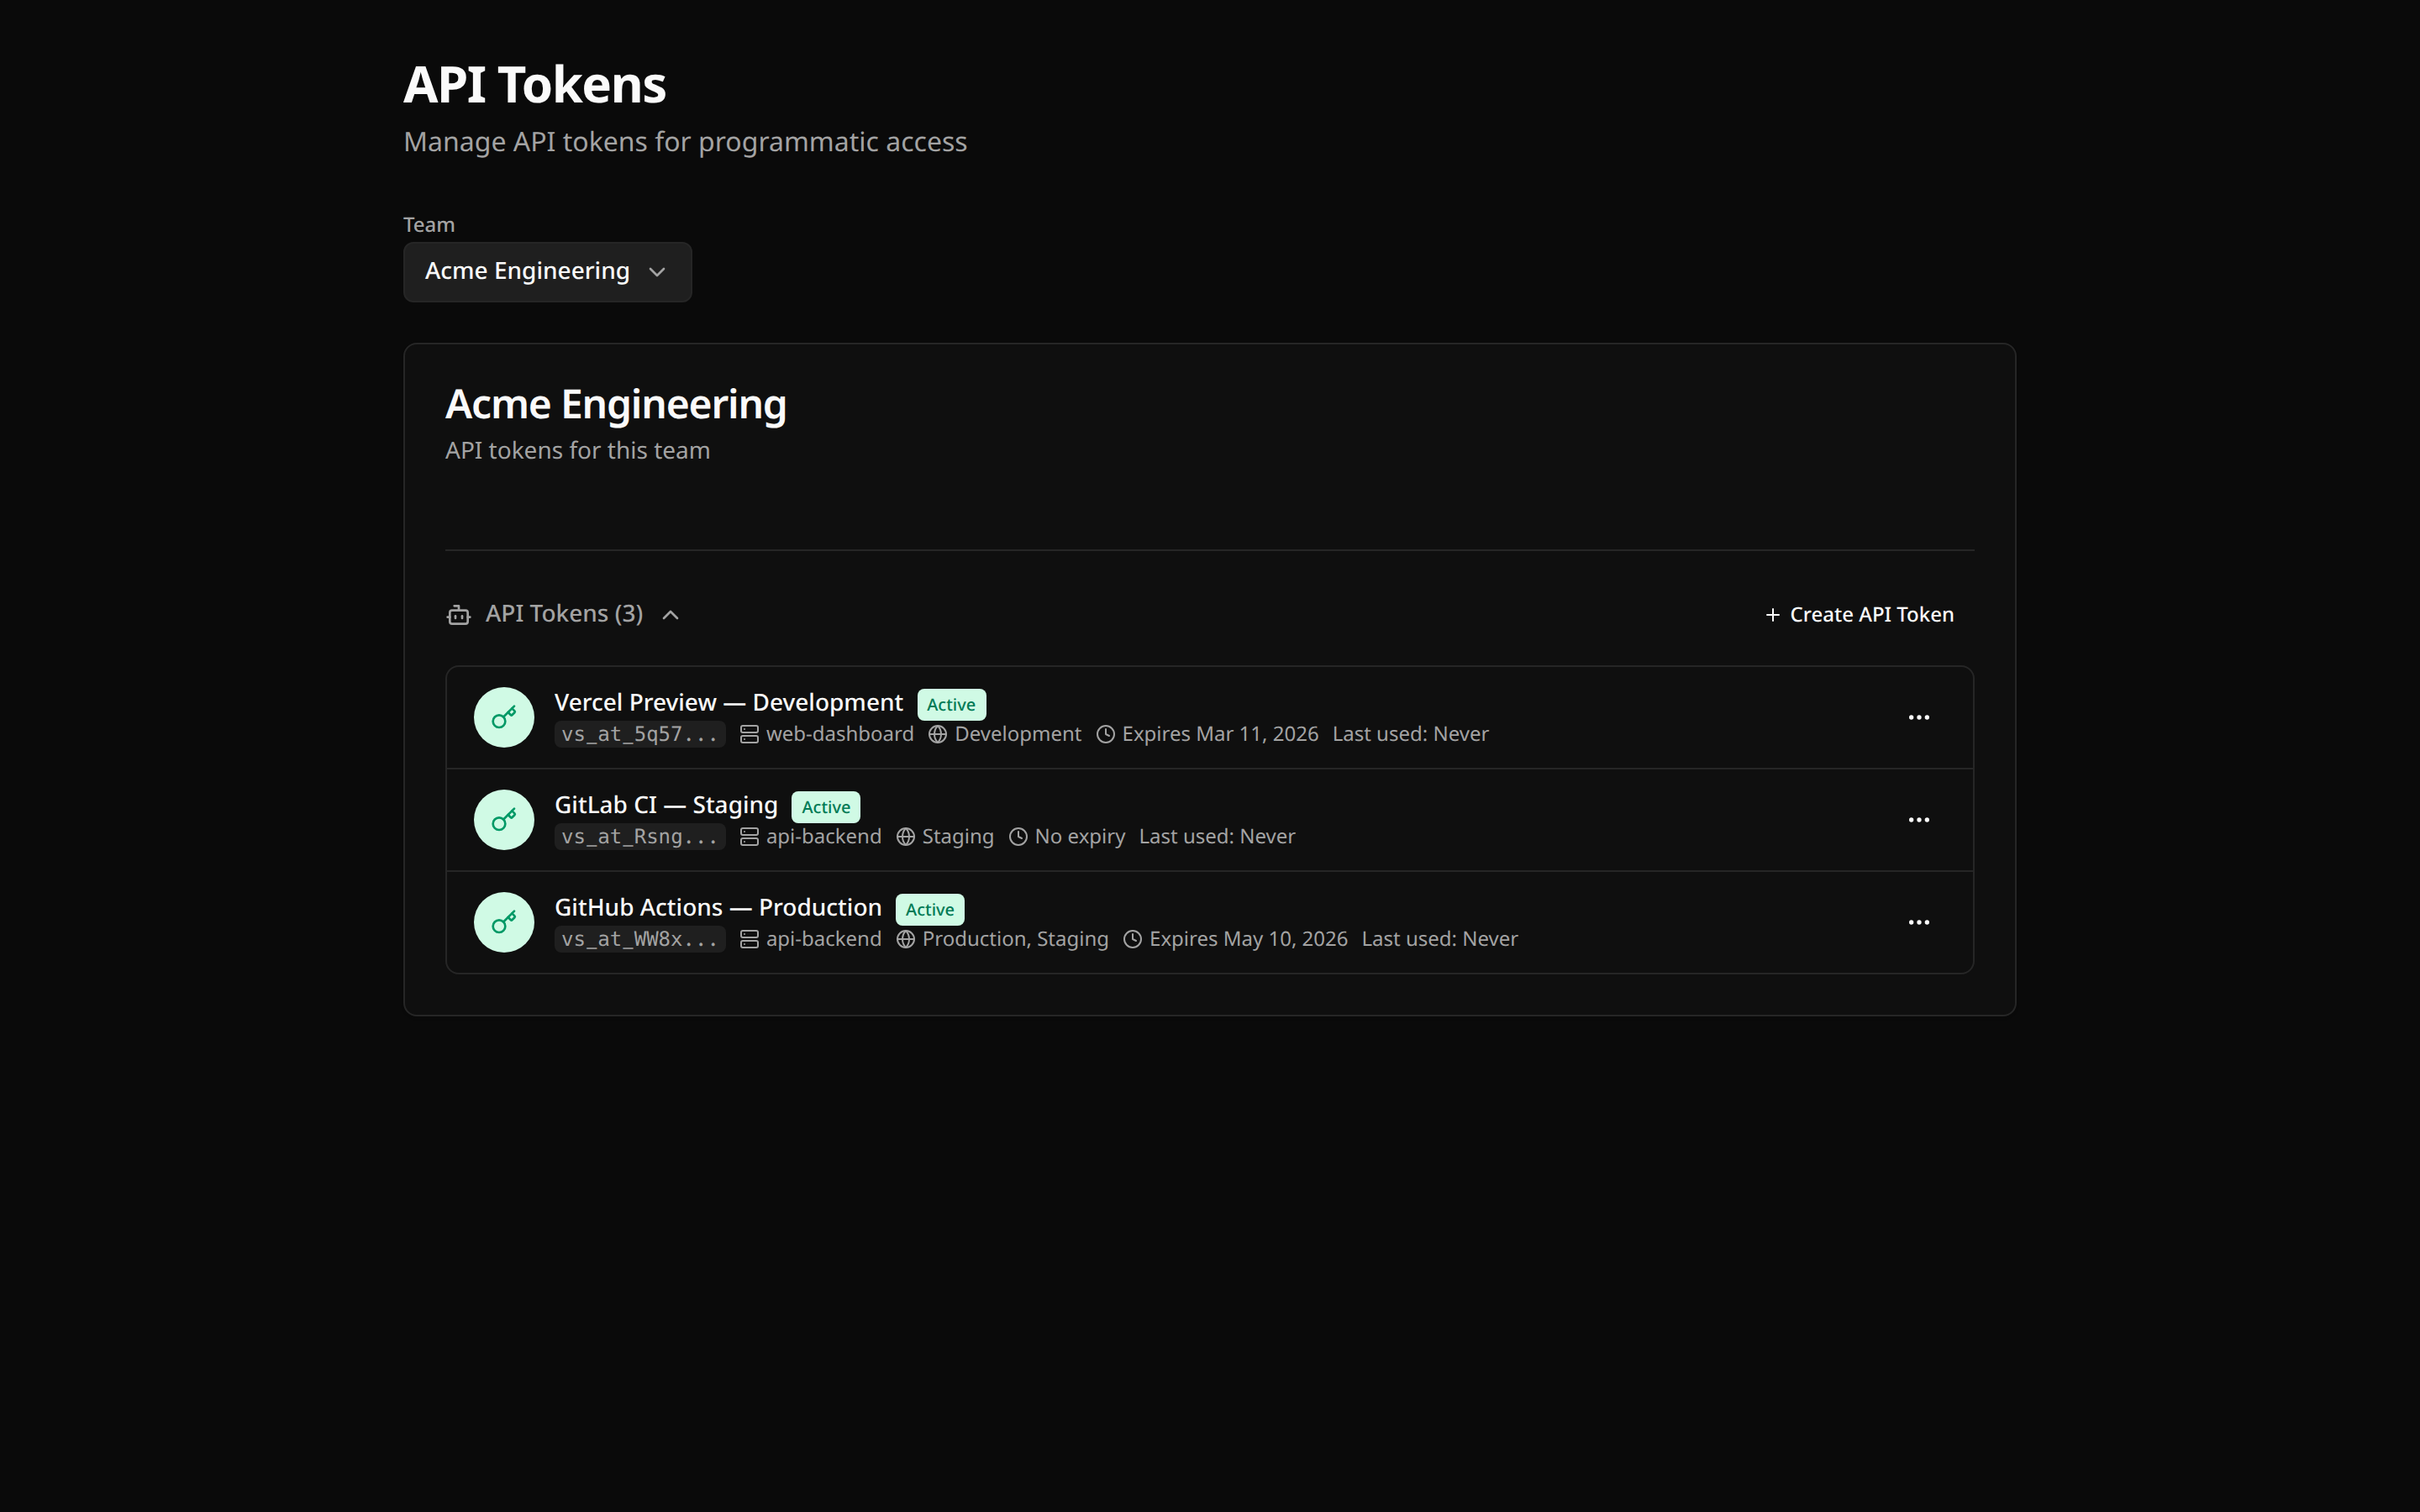 ## Token Properties
- **Team-scoped** — a token belongs to exactly one team and can never access another team's data
- **Name** — 1–100 characters, for identification (e.g., "GitHub Actions - Production Deploy")
- **Access level** — `read` (the default) or `write`. A read-only token can read secrets but is refused on every write. See [Access level](#access-level)
- **Project scoping** (optional) — restrict the token to specific projects; unscoped tokens can access all of the team's projects
- **Environment scoping** (optional) — restrict the token to specific environments by slug (e.g., only `staging`); unscoped tokens can access all environments
:::warning[Project and environment scopes multiply — they are not pairs]
The two lists are checked independently, so a token scoped to projects `api`, `web` and
environments `staging`, `production` reaches **all four** combinations — including
`api/production` and `web/production`. There is no way to express "`api` in production and
`web` in staging" in one token; that needs two tokens.
:::
- **Expiration** (always set) — every token expires. If you do not choose a lifetime, the plan maximum is applied:
| Plan | Maximum token lifetime |
| --------- | ---------------------- |
| Developer | 90 days |
| Team | 365 days |
- **Format** — tokens start with the `vs_at_` prefix; only a salted hash is stored server-side
- **Last-used tracking** — each authenticated request records the timestamp, IP address, and user agent, visible in the dashboard
:::info
Active tokens per team are capped at a high abuse-prevention limit (500 on Developer, 2,000 on Team — raised on request).
:::
## Creating a Token
Only **owners and admins** can create and manage tokens ([roles reference](/reference/roles)).
1. Go to your team settings in the dashboard
2. Navigate to **API Tokens**
3. Click **Create API Token**
4. Enter a descriptive name
5. Choose **Read-only** under Access if the token never needs to write
6. Optionally scope the token to specific projects and environments
7. Optionally set a shorter expiration than the plan maximum
8. Click **Create** and **copy the token immediately**
:::danger
The token value is shown exactly once, at creation. It is stored only as a hash — if you lose it, rotate or create a new one.
:::
## Access level
Every token carries an action ceiling, evaluated separately from its project and environment scoping.
| Level | Effect |
| --- | --- |
| `read` | Read secrets within the token's scope. Creating, updating, rotating, rolling back and deleting are all refused. **The default** when no level is requested |
| `write` | Read secrets, and create, update, rotate, roll back or delete them, within the token's scope. Granted only when asked for |
Choose read-only for anything that only consumes secrets — a CI job that injects configuration at deploy time, a service that reads config at boot, a script that inventories keys across projects.
:::warning[Read-only protects integrity, not confidentiality]
A read-only token still reads every secret **value** in its scope. It cannot damage your secrets, but if it leaks, everything it could read is exposed. Narrow the scope as well as the level, and keep the expiry short.
:::
The level also does not reach past the API. It stops writes to varsafe; it does not stop the machine holding the token from writing what it read to a local file — `varsafe export --plain` works with a read-only token. A token may also always revoke *itself* (`DELETE /me/token`), which is deliberate: a compromised credential should be able to kill itself without an admin.
Set it in the dashboard when creating the token. Driving it over the API instead means
`POST /teams/{teamId}/api-tokens` with an `accessLevel` field:
```json
{ "name": "ci-inject", "accessLevel": "read" }
```
Omitting the field yields a `read` token; send `"accessLevel": "write"` for a token that changes secrets.
:::note
Everything under `/teams/{teamId}/api-tokens` — creating, listing, editing, rotating,
revoking, deleting — requires an interactive owner or admin **session**, the same one the
dashboard uses. Those routes do not accept a Bearer token, so **an API token cannot mint or
edit another token**. The one exception is a token revoking itself through
`DELETE /me/token`, which is Bearer-authenticated by design.
:::
The request body is strict: a misspelled key such as `accessLevell` is rejected with `400`
rather than ignored. That matters more here than elsewhere — dropping it would answer a
request for a *narrower* credential with a full read-and-write one.
To confirm what a token you already hold can do, ask the API with the token itself:
```bash
curl -sH "Authorization: Bearer $VARSAFE_TOKEN" https://api.varsafe.dev/me/verify
```
The response carries `accessLevel` for token principals.
### Narrowing an existing token
A token can be changed to read-only after the fact — no rotation window, and the token
already in circulation keeps working with the narrower ceiling. Do it from the token's row
in the dashboard, or with `PATCH /teams/{teamId}/api-tokens/{tokenId}` and
`{"accessLevel":"read"}` from an admin session.
The change applies to every request authorized **after** it commits. A write that already
passed its authorization check runs to completion, so narrowing is not a way to abort work
in flight — revoke the token if you need to stop it now.
This ratchets one way only: widening `read` back to `write` is refused, so create a new
token instead.
Tokens minted for **headless CLI logins** are the exception — their access level cannot be
changed at all (renaming still works). The level is derived from the CLI's granted scopes
when the device is exchanged, so the next login on that machine would restore write if the
new grant includes `secrets:write`, silently undoing the narrowing. Re-issue those with
narrower scopes rather than editing them.
## MCP scopes
A token can also authenticate an AI agent against the hosted MCP endpoint — useful on a machine
with no browser, or when the agent should act as a different account than your CLI. See the
[MCP guide](/guides/mcp) for client configuration.
This is **opt-in per token**. A token with no MCP scopes is refused by the MCP endpoint, so
existing tokens gain nothing until you grant them scopes explicitly.
What you can grant is bounded twice over:
- **By the token's access level.** A read-only token cannot hold `secrets:write`. Narrowing a
token to read-only later removes that scope in the same change, so the ceiling and the agent
surface can never disagree.
- **By your own role.** You cannot grant a token more MCP authority than you hold yourself — the
same role limits that apply on the consent screen.
Like the access level, the scope set ratchets one way: scopes can be removed, never added. Removing
all of them switches the agent surface off while leaving the token working for the HTTP API.
Actions taken through a token are audited as the token, not as the person who created it. The
creator's membership still governs it — if they leave the team or are deactivated, the token stops
working everywhere, MCP included.
## Using a Token
Set the token in the environment; the CLI picks it up automatically. `VARSAFE_API_TOKEN` is the primary variable, `VARSAFE_TOKEN` is an accepted alias:
```bash
export VARSAFE_API_TOKEN=vs_at_vsafe_example
varsafe run -p my-api -e production -- ./deploy.sh
```
For a persisted login (saved to the encrypted credential store), use one of the safe input paths:
```bash
# Secure prompt — masked input, nothing in shell history
varsafe login -T
# Stdin pipe — from a CI secret or secure store
echo "$VARSAFE_TOKEN" | varsafe login -t -
# Environment variable
VARSAFE_TOKEN=vs_at_vsafe_example varsafe login
```
:::warning
Avoid `varsafe login -t
## Token Properties
- **Team-scoped** — a token belongs to exactly one team and can never access another team's data
- **Name** — 1–100 characters, for identification (e.g., "GitHub Actions - Production Deploy")
- **Access level** — `read` (the default) or `write`. A read-only token can read secrets but is refused on every write. See [Access level](#access-level)
- **Project scoping** (optional) — restrict the token to specific projects; unscoped tokens can access all of the team's projects
- **Environment scoping** (optional) — restrict the token to specific environments by slug (e.g., only `staging`); unscoped tokens can access all environments
:::warning[Project and environment scopes multiply — they are not pairs]
The two lists are checked independently, so a token scoped to projects `api`, `web` and
environments `staging`, `production` reaches **all four** combinations — including
`api/production` and `web/production`. There is no way to express "`api` in production and
`web` in staging" in one token; that needs two tokens.
:::
- **Expiration** (always set) — every token expires. If you do not choose a lifetime, the plan maximum is applied:
| Plan | Maximum token lifetime |
| --------- | ---------------------- |
| Developer | 90 days |
| Team | 365 days |
- **Format** — tokens start with the `vs_at_` prefix; only a salted hash is stored server-side
- **Last-used tracking** — each authenticated request records the timestamp, IP address, and user agent, visible in the dashboard
:::info
Active tokens per team are capped at a high abuse-prevention limit (500 on Developer, 2,000 on Team — raised on request).
:::
## Creating a Token
Only **owners and admins** can create and manage tokens ([roles reference](/reference/roles)).
1. Go to your team settings in the dashboard
2. Navigate to **API Tokens**
3. Click **Create API Token**
4. Enter a descriptive name
5. Choose **Read-only** under Access if the token never needs to write
6. Optionally scope the token to specific projects and environments
7. Optionally set a shorter expiration than the plan maximum
8. Click **Create** and **copy the token immediately**
:::danger
The token value is shown exactly once, at creation. It is stored only as a hash — if you lose it, rotate or create a new one.
:::
## Access level
Every token carries an action ceiling, evaluated separately from its project and environment scoping.
| Level | Effect |
| --- | --- |
| `read` | Read secrets within the token's scope. Creating, updating, rotating, rolling back and deleting are all refused. **The default** when no level is requested |
| `write` | Read secrets, and create, update, rotate, roll back or delete them, within the token's scope. Granted only when asked for |
Choose read-only for anything that only consumes secrets — a CI job that injects configuration at deploy time, a service that reads config at boot, a script that inventories keys across projects.
:::warning[Read-only protects integrity, not confidentiality]
A read-only token still reads every secret **value** in its scope. It cannot damage your secrets, but if it leaks, everything it could read is exposed. Narrow the scope as well as the level, and keep the expiry short.
:::
The level also does not reach past the API. It stops writes to varsafe; it does not stop the machine holding the token from writing what it read to a local file — `varsafe export --plain` works with a read-only token. A token may also always revoke *itself* (`DELETE /me/token`), which is deliberate: a compromised credential should be able to kill itself without an admin.
Set it in the dashboard when creating the token. Driving it over the API instead means
`POST /teams/{teamId}/api-tokens` with an `accessLevel` field:
```json
{ "name": "ci-inject", "accessLevel": "read" }
```
Omitting the field yields a `read` token; send `"accessLevel": "write"` for a token that changes secrets.
:::note
Everything under `/teams/{teamId}/api-tokens` — creating, listing, editing, rotating,
revoking, deleting — requires an interactive owner or admin **session**, the same one the
dashboard uses. Those routes do not accept a Bearer token, so **an API token cannot mint or
edit another token**. The one exception is a token revoking itself through
`DELETE /me/token`, which is Bearer-authenticated by design.
:::
The request body is strict: a misspelled key such as `accessLevell` is rejected with `400`
rather than ignored. That matters more here than elsewhere — dropping it would answer a
request for a *narrower* credential with a full read-and-write one.
To confirm what a token you already hold can do, ask the API with the token itself:
```bash
curl -sH "Authorization: Bearer $VARSAFE_TOKEN" https://api.varsafe.dev/me/verify
```
The response carries `accessLevel` for token principals.
### Narrowing an existing token
A token can be changed to read-only after the fact — no rotation window, and the token
already in circulation keeps working with the narrower ceiling. Do it from the token's row
in the dashboard, or with `PATCH /teams/{teamId}/api-tokens/{tokenId}` and
`{"accessLevel":"read"}` from an admin session.
The change applies to every request authorized **after** it commits. A write that already
passed its authorization check runs to completion, so narrowing is not a way to abort work
in flight — revoke the token if you need to stop it now.
This ratchets one way only: widening `read` back to `write` is refused, so create a new
token instead.
Tokens minted for **headless CLI logins** are the exception — their access level cannot be
changed at all (renaming still works). The level is derived from the CLI's granted scopes
when the device is exchanged, so the next login on that machine would restore write if the
new grant includes `secrets:write`, silently undoing the narrowing. Re-issue those with
narrower scopes rather than editing them.
## MCP scopes
A token can also authenticate an AI agent against the hosted MCP endpoint — useful on a machine
with no browser, or when the agent should act as a different account than your CLI. See the
[MCP guide](/guides/mcp) for client configuration.
This is **opt-in per token**. A token with no MCP scopes is refused by the MCP endpoint, so
existing tokens gain nothing until you grant them scopes explicitly.
What you can grant is bounded twice over:
- **By the token's access level.** A read-only token cannot hold `secrets:write`. Narrowing a
token to read-only later removes that scope in the same change, so the ceiling and the agent
surface can never disagree.
- **By your own role.** You cannot grant a token more MCP authority than you hold yourself — the
same role limits that apply on the consent screen.
Like the access level, the scope set ratchets one way: scopes can be removed, never added. Removing
all of them switches the agent surface off while leaving the token working for the HTTP API.
Actions taken through a token are audited as the token, not as the person who created it. The
creator's membership still governs it — if they leave the team or are deactivated, the token stops
working everywhere, MCP included.
## Using a Token
Set the token in the environment; the CLI picks it up automatically. `VARSAFE_API_TOKEN` is the primary variable, `VARSAFE_TOKEN` is an accepted alias:
```bash
export VARSAFE_API_TOKEN=vs_at_vsafe_example
varsafe run -p my-api -e production -- ./deploy.sh
```
For a persisted login (saved to the encrypted credential store), use one of the safe input paths:
```bash
# Secure prompt — masked input, nothing in shell history
varsafe login -T
# Stdin pipe — from a CI secret or secure store
echo "$VARSAFE_TOKEN" | varsafe login -t -
# Environment variable
VARSAFE_TOKEN=vs_at_vsafe_example varsafe login
```
:::warning
Avoid `varsafe login -t
### Compromised Secret
1. **Rotate immediately** — Dashboard → Secrets → rotate, or `varsafe set` for automation
2. **Review audit logs** — who had access? When? From which IP addresses?
3. **Assess impact** — which systems use this secret? Was there unauthorized access?
4. **Document the incident** — timeline, actions taken, lessons learned
### Compromised Account
1. **Revoke sessions immediately** — Profile → Security → revoke all sessions
2. **Reset the password** — or enable passkey-only mode
3. **Review audit logs** — what did the account access? Were any secrets exported?
4. **Rotate affected secrets** — assume compromise; rotate everything the account could read
5. **Report to the team** — notify security, document for compliance
### Compromised API Token
1. **Revoke immediately** — team settings → API Tokens → Revoke
2. **Create a new token** — scoped at least as tightly as the old one
3. **Update configurations** — CI/CD systems, automated scripts
4. **Review token usage** — check audit logs and the token's last-used IP/user agent for unauthorized access
### For developers
1. **Never commit plaintext secrets** — use `varsafe run`, or encrypted exports when a file is unavoidable
2. **Use passkeys** — phishing-resistant, stronger than passwords
3. **Enable 2FA** — protects password-based accounts
4. **Review audit logs** — watch for anomalies
### For admins
1. **Principle of least privilege** — viewer or operator for most members, developer only where writes are needed
2. **Protect sensitive environments** — protection restricts writes to owners and admins
3. **Regular access reviews** — remove departed members; their key access triggers automatic keypair rotation
4. **Scope API tokens** — one token per pipeline, narrowed to its project and environment
### For security teams
1. **Export audit logs** — feed CSV or JSON exports into your SIEM before the retention window prunes them
2. **Test incident response** — simulate a compromised secret and a compromised token
3. **Review token inventory** — expirations, scoping, last-used timestamps